


So I decided to make one for him, snapping some tutorial pictures along the way.
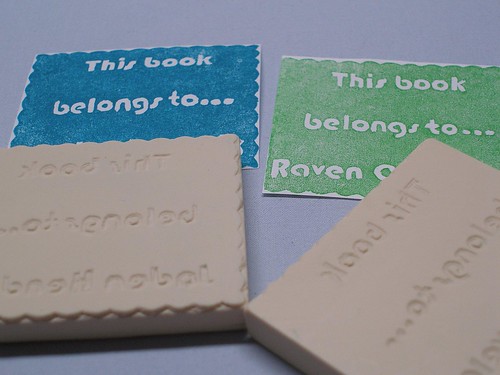
Carving these took between 30 minutes and an hour each (30 for the text, 30 for the scalloped edging). And each one cost about a buck for materials. The carving tool was less than 10 dollars and it's been a fantastic investment (considering we've already used it to carve some awesome Stephen King pumpkins).
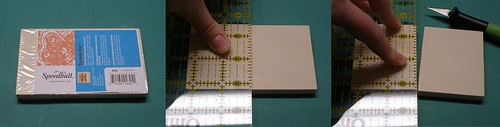
Supplies (I have links to different companies because those were the best prices I found on the internet, but if you plan to buy both the blocks and the cutter, I'm sure you'd save on shipping by getting them from the same place.)
- linoleum cutter
- Blank Cutting Block (2.75x4.5)
- sharp blade for cutting the stamp into 2 pieces
- printer
- paper
- double stick tape (helpful, but not completely necessary)
- scalloped edged scissors or rotary cutter (optional- for the fancy edging)
- super sticky masking tape (optional- for the fancy edging)
-You can cut the block in half, which produces two smaller stamps that will be more likely to fit all books.
- Always use a cutting mat or a very thick piece of cardboard underneath.
- Try to keep the blade perpendicular to the cutting mat otherwise it can go a bit wonky.
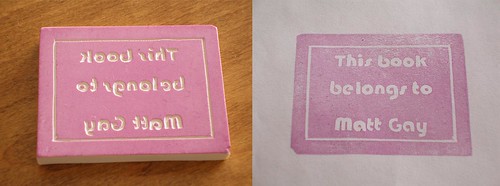
- For the simple straight lines on Matt's, I just used tape as a guide.
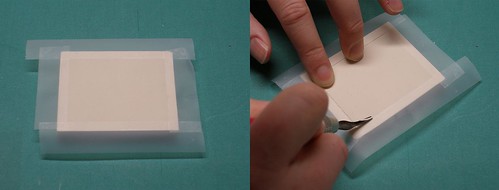
- For the scalloped edges (either all the way around, or just top and bottom), I cut the masking tape with a rotary cutter (scalloped scissors would work well too)...
- placed it along the edges to create a pattern (being careful at the corners- they're kind of fiddley)...
- rubbed it down really well with my thumbnail (otherwise the tape tends to come loose)...
- then I carved the stamp where the tape wasn't. (Also, never cut towards your finger. This is a picture of what you shouldn't do. But then again, you probably won't be trying to take pictures while you do this.)

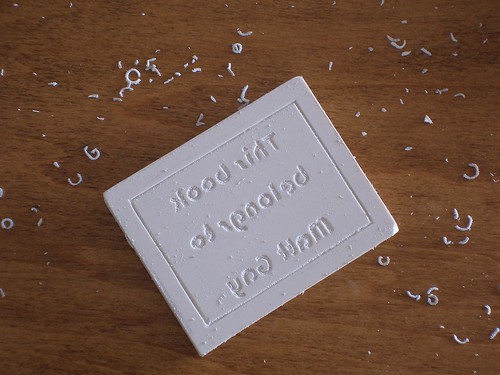
- It should look exactly like you want it to appear when you stamp, not a mirror image.
- I created a rectangle that was 2.75" x 2.25" (the exact size of the stamp) to help line it up later.
- Bauhaus 93 was a pretty easy font for me to carve.
- Don't forget to save this document to your hard drive. It's much easier to open the old file and change the name for the next birthday kid than to recreate it. (I'm putting this tip in here because I completely forgot to do it. But, you're probably much more on top of things than I am, so you can pretend I didn't say anything.)
-Transfer the image to the stamp.
- Make sure your printer is not out of ink because it will significantly lighten the transfer.
- Clear a flat, hard surface near to your printer to work on.
- Put a few pieces of double stick tape on the front side of the stamp.
- Print the document, lay it face up and then immediately turn the stamp over onto it, lining it up with the printed rectangle.
- Flip it over and rub the back of the paper with the back of your fingernail (or spoon).
- Peel up carefully. The writing will automatically be a mirror image, which is what you want.
- If for some reason it's crooked or badly smeared, you can just wash the stamp with soap and water, let dry and then give it another shot.

- Slowly and carefully, carve out the words.
Tips
-These carving blocks tend to be a bit crumbly. After you're done carving, gently scrubbing it with a clean toothbrush will give it a nice smooth surface.
As with any of my craft projects, I'd love to see your versions if you give them a try.
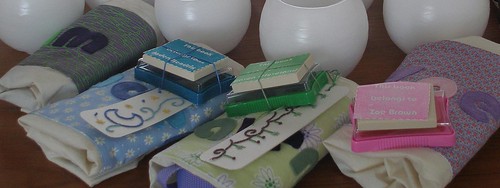
Also, be sure to come back next week for more of the Book Gift Set, complete with a tutorial for the personalized library bags.
--------------------------------
Enjoy this tutorial?
Get more like it by subscribing to my RSS feed
--------------------------------
Related Posts
Personalized Library Book Bags
Handsewn, Handpainted Bookmarks/Gift Tags
Cute Little Produce Stamps
Customized Portrait Stamp

11 comments:
This is AWESOME!!! Thanks so much for sharing the how-to for this fabulous project. What a great gift idea! I'll be linking.
So groooooooooooooovy! Thanks for the tute, toots.
We are off to get supplies- love it-super tutorial! thanks for sharing :)
I love this. I especially love the little gift set that you've put together at the bottom of the post.
Really cute idea. Thank you for sharing.
That is so freaking awesome. If I didn't have arthritis I'd make one that says "WOLVERINES!" Or "This book is filled with anthrax". That way no one would steal my books unless it was worth the risk of anthrax, in which case they could totally have the book. Unless they thought I was talking about the band "anthrax". Then I'd just have to put a little notation that says "the poison...not the band". Then I'd run out of room. This is why I don't carve bookplates.
Amazing oprject and looks super easy!
Thanks!
Just found some leftover Easy Cut. Hopping on this. Thanks for the idea!!!!
What a great idea for Christmas presents along with a book. Thank you so much for sharing this.
This is WONDERFUL!!!! My son is an avid reader, spending more time at the library and the bookstores than any other place (thank goodness) ... and this is a PERFECT gift for him. Thank you so much for sharing this tutorial.
This is a good idea. As a teacher I am always in need of a stamp that says postive things or please fix this notes. And I have tons of books! When I have some free time (if is more like it) I'll try to make a stamp or two. Thanks for the info.
Post a Comment