In preparation for one of our favorite holiday craft activities, I start collecting blown eggs early. I find it helpful to blow the eggs as I use them in recipes, so I don't end up with Mason jars full of raw eggs.
Why blow the eggs instead of just hardboiling them? Well, when you put as much effort into these suckers as we do, you'll want to have them around year after year. And as much as we love to decorate eggs, a family can only eat so many deviled eggs.
First, some lovely pics for inspiration.

(Jenny made this one. She usually does at least one garden scene each year.)
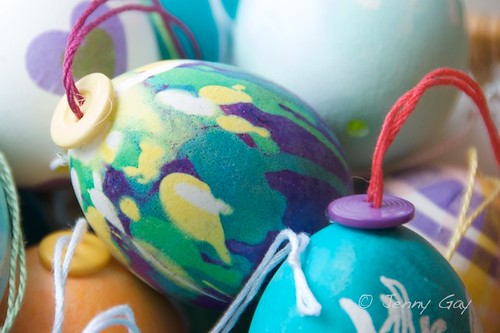
(I did this drippy looking one several years ago. It's still one of my favorites.)

(Joey made this alien, which amuses me greatly.)
The first year that we ever tried dying blown eggs I gave myself a serious case of TMD as Jeff's ex-wife and I spent the better part of an hour blowing through egg after egg in order to make enough for the 4 kids to dye. Ah, good times. (But that was before I discovered the brilliance of a special tool.)
So here's the setup I keep at hand to make the whole process easier and ensure that I don't find myself blowing a bunch of eggs the night before we need them.
Collect these materials next to your sink. Make sure everything is well washed.

You will need...
-A bowl to collect the egg guts.
-A pin (the kind with a round head is more comfortable to use or you can use a needle and a cork, as described in Awesome Tip # 2)
-Some toothpicks
-A brand new bulb-type nasal aspirator (Make sure to get the manual type. And I'd suggest getting the kind that comes apart into 2 pieces because they're easier to clean.)
Every time you need an egg for a recipe, try to remember not to just crack it, but extract the contents using this method. (Obviously this will only work if it's ok that the yolk and whites get all mixed up in whatever you need the egg for. You will *not* get a decent fried egg using this process.)
How To
-Using the pin, poke a hole in one end of the egg.

-Carefully, holding the pin at an angle, enlarge the hole a bit.

-You'll want it to be about this size.

-On the other end of the egg, make a slightly bigger hole, about this size (which should be big enough for a toothpick).

-Use the toothpick to break up the yolk inside the egg.
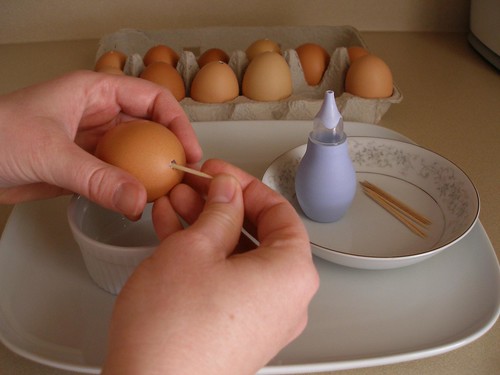
-Place the aspirator over the smaller hole, making sure that the bulb is unsqueezed before you do so.

-While gently holding the bulb against the hole, squeeze the aspirator. Some of the egg will come out.
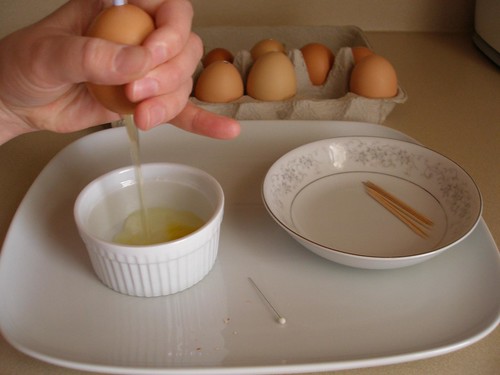
-Now here's the important bit, make sure to lift the aspirator away from the egg before you release pressure and allow the bulb to return to its normal size. (If you don't remove it from the egg, you'll find that you suck egg guts up into the aspirator. Yah, I usually do this at least once a year. It's easy to forget.) Then put it back to the eggshell and squeeze again. Repeat until the egg is empty.
-Once it's empty, you can just rinse it and put it directly into a carton or, if you'd like, fill the egg with water, shake gently and blow it out again to clean the inside as well.
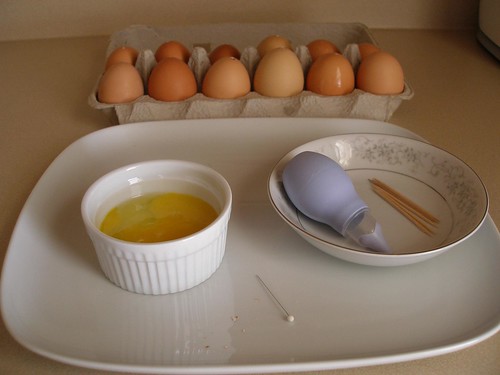
-Use the egg innards, throw away the toothpick and wash everything else in hot, soapy water so it's ready for the next time.
-Admire your growing collection of blown eggs.
How bout you? Do you all ever blow eggs to save or is it all temporary art at your house?
--------------------------------
Enjoy this tutorial? Get more like it by subscribing to my RSS feed
------------------------------
Related Posts-
Ukrainian Egg Dying

Less Frustrating Ways to Dye Blown Eggs

Egg Drying Rack

Hanging Blown Eggs

Indoor Easter Garden


19 comments:
Gonna have to try this! What dyes to do you use?
Awesome idea for emptying the shell!
I'm also wondering about something ... those button hangers.
I assume the buttons are adhered to the eggs? What kind of glue do you use?
I swear that when growing up Elmer's worked for everything ... but I'm learning that I might not correctly remember that bit of childhood. :)
Oh I can't wait to try this. If I do that all year then, I should have plenty for next Easter:)
this is my first year. and yes I've already started. 2 dozen so far. thinking the two year old may prefer egg mosaics and not leave any for me!
so many little projects planned, and will be saving them for next year if they survive. yours are so beautiful. what an inspiration, i just hope i get at least a dozen unbroken out of the deal.
@tiffany. im sure wendy will have something fabulous and i hate to fill up her blog comments but wanted to share. we just use herbs, veggies, plants.
tumeric - yellow
beets - purplish
hibiscus - pinks
parsley, basil, spirulina - greens
blueberries - blues
im still looking for an orangy color.
Well we haven't blown eggs before - we normally decorate them and then race them down the hill at Shotover just outside Oxford in the UK. Boiled with plenty of paint and varnish is definately the way to win the Demolition Derby.
But maybe, now you've shown me how to, I will try it this year.
@latisha We use onion skins for a light browny orange.
-Tiffany, we have used our share of natural dyes like Latisha suggests, but most of the time we use a special powdered dye (specifically for Ukranian dying) that they sell at the local art store. Which is another reason to use blown eggs, those dyes aren't food safe.
-CuddlyBunny, we actually used the hot glue gun for these, I think. If you thread the button and put it up through the bottom, though, you don't actually need any glue.
-Shannon, I bet you've got enough time this year to collect a good little batch before Easter. (And if you do need to do a whole bunch at once, a breakfast strata is a super tasty recipe to make for Easter and uses a bunch of eggs at once.)
-latisha, good luck with yours and thanks so much for the list of natural dyes. Honestly, it's been awhile since we've gone all natural, but I'm in the mood to do it this year. And I always appreciate it when people fill up my blog with comments. I am certainly not some kind of egg dying expert. Or any other kind of expert. ;)
-whatsonox, somehow I doubt that hollow eggs would survive the demolition derby so well. What a fun idea, though.
What an awesome idea!
Wonderful idea. I use to make blown eggs when I was a teenager, but all the manual blowing of the eggs is horrible. This makes me want to do it again!
Tonight I bought a big bunch of eggs so I can start emptying them and saving the shells for dyeing. Thanks for the how-to! I love y'all's eggs from past years :).
Fabulous post! I'll be linking to this in my weekend review at Ready, Set, Craft! Thanks for all the great tips!
http://www.readysetcraft.blogspot.com
This is our first year for pysanka (the Ukranian Easter eggs from which the dyes come). In something I read through all of my research on those, you are supposed to be able to tie a piece of fishing line type material ( probably the stuff used for jewelry would work the same way) onto a very short broken off end of a toothpick, insert it into the hole of the egg and then wiggle it into place, wedged upwards against the inside of the egg... the end of which is outside the egg and you can string your bobble onto it or just give it a loop for hanging.
Also, you don't need to blow the eggs to keep them... you just have to be cautious with them from year to year as the insides will dry up over time without any smell. I'm sure a lot of you already know that, but this city girl learns something new every year! :)
I'm feeling inspired to blow this year! In the past, all temporary.
Thanks,
P-
Wendy, thanks for the info on blowing out eggs -- I'd never done it before and now have 3 dozen empty eggshells waiting for dye :).
One question: Boiled eggs are heavy and sink down into the dye, but empty eggshells are extremely lightweight -- how do you submerge the eggs into the dye???
!!!! Thank you thank you thank you!! Soooo many times throughout my life I've avoided painting eggs because on one hand I like to keep the masterpieces, but on the other hand I don't like to waste food. This is the perfect solution. Hurray!!!! =o)
--R. Fungus.
First of all, sorry to all of you who had comments that just showed up today (issues between me and blogger, but mostly a case of me not paying attention when I changed certain settings). Sorry!
Joanne, thanks for the link!
snpnmnmi, I have another post planned for how to string these guys up. And yah, I've heard you can just leave the egg inside, but I've never had the guts to try it. That's one dangerous stink-bomb to be storing in with the rest of the decorations.
Glenda, yes, these eggs won't sink in the dye. We usually use super concentrated dyes (from the art store) so you really only need to put them in the dye and spin them around for a few seconds with a spoon (or even apply them with q-tips). When you use regular dyes that they sell at the grocery store, you need to be a bit more vigilant with spinning because they'll need more time in the dye. I'm trying to figure out how to remedy that particular problem, but the solution, so far, is less than perfect.
We blow our eggs and hang them from a 'potted' branch to create the egg tree. My mom still has some that we did more than 30 years ago. I hope to keep mine that long as well.
When you are dying them you can use a spoon, or wire or other instrument to keep them under water until you get the color you want. You just have to remember to drain them really well or the dye that ends up inside the egg bleeds into the next color. Drying them without the 'wet spot' at the base has always been my challenge.
Wendy, I believe you had what we commonly refer to in our household as a brain fart (re: the comment snafu) ;-). No worries; I figured you were busy!!
Gigi, thanks for the tip -- I may straighten out a paper clip and see how that works. I bought another 3 dozen to blow out, so I have time to do some experimenting before Easter rolls around. If I get something successful figured out, I'll post it on my blog but come back here and post a link to it. Ditto if I figure out a way to dry them out of the egg carton.
So clever... and I even already have one of those devices too!
Post a Comment