


This project has brought me such amusement, despite the fact that I almost gave up after just an hour into it because my chin was starting to remind me of the movie Mask. When I informed Jeff, he wanted to know which movie I meant, the sad Eric Stoltz one or the funny Jim Carrey one.
But I kept at it and it turned out more like librarian Medusa and less like Rocky Dennis (only a slight hint of a goiter left). Since finishing, I've sat and stared at it for minutes that have probably added up to hours. And you wanna know what my favorite part is? The nose piece on my glasses. I know. I'm a dork. But that little detail just does me in every time. Because it totally looks like the nose piece on my glasses!
(It starts to get trippy looking at yourself for this long. And talking about trippy, just how huge are my hands?)
If you'd like to try this, I suggest reading the tutorial here to get yourself familiar with the process of carving pumpkins this way. What follows are my modifications and tips.
Tools
-Metal pottery scrapers
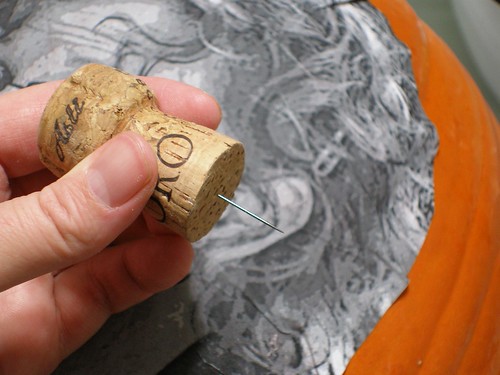
-Champagne cork, needle and pliers (or just a pushpin)
-Linoleum cutters or wooden carving tools are excellent for working the design.
-Don't forget that little knife that comes with the standard carving kits. Despite its cheapness, it is actually pretty useful.
Clean the Pumpkin
-You know, cut off the top, remove the guts, smooth the inside.
-The part that you're carving should be about half an inch thick and a fairly consistent thickness.
-It's not a bad idea to cut an inch-wide hole in the bottom back of the pumpkin and a big one in the lid for airflow, especially if you don't have a lot of white space in the design. This is to ensure that there's enough air flow to keep your candle lit.
Create the Pattern (I had forgotten that a good chunk of this part originally came from Photojojo. Thanks guys!)
-It's best to have a high-resolution photo with a dark background. (Aurora took this one while I was weeding, during our garage sale, modeling a vintage sports coat, oddly enough.)
-Using photoshop Jenny helped me convert the picture to black and white and cranked up both the brightness and the contrast.
-Then used the poster effect in the Filter Gallery.
-You might need to mess with the levels a bit in order to get it to something you think you can carve.
-A level of 3 will give you black, white and one shade of gray; this will be the easiest to carve.
-My picture below was a level 6, with some black, some white and four different shades of gray. This makes it much more complicated, but also, much more realistic.

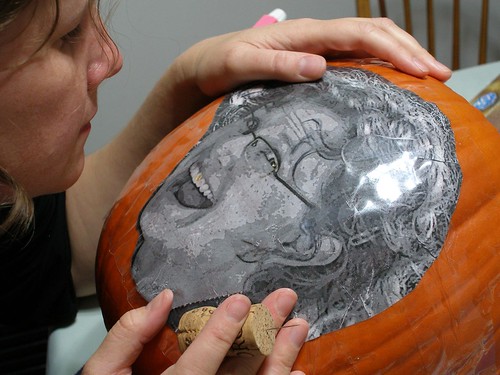
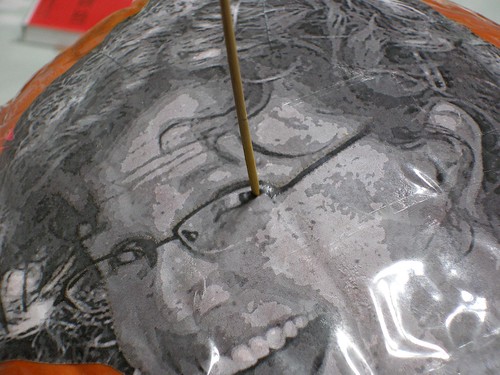
Awesome Tip #1- I printed this out on a laser printer (but a Xerox copy would work too). If you want, you can go ahead and print it with a regular inkjet and just tape it to the pumpkin, but it might be worth the time it takes to get it printed up at the copy center (if you don't have your own laser printer). That's because laser printer ink is not soluble in water and, here's the important bit, it does not smear when it gets wet. Which allows you to mold the pattern perfectly over the pumpkin. Like so.
(Spray the paper evenly with water, let it soak in for a bit and then gently form it onto the pumpkin, pressing it into the cracks. It works best if you can find the smoothest pumpkin possible, without deep grooves. Also be careful not to rub it too much or you'll rub the design right off. You can do this with most of the store-bought patterns out there. To test it just lick your thumb and run it over the ink; if it doesn't smear, you're good to go.)
After the paper is molded to the pumpkin, you can either let it dry or just tape over the entire thing with clear packing tape. If you try to poke holes directly on the wet paper, you will rip little tiny holes with each pin prick. Makes it hard to follow the pattern.
Awesome Tip #2- In years past, I've just used a pushpin to poke the holes around the pattern, but this year I created this poking tool using a champagne cork and a needle. I just shoved it right in there using pliers. You wouldn't believe how much more comfortable it was to use this thing. It does make smaller holes, which was good for me because of the detail involved. But if you have a hard time seeing the holes, you may want to try a thicker needle or just stick (heh, heh) with a pushpin.
Transfer the Pattern
-With the needle, you'll want to poke holes around the lines that separate the various colors.
-This one was way complicated so I didn't poke holes between a lot of the different shades of gray.
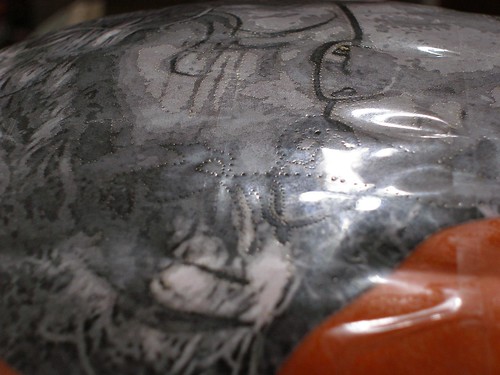
While I had the pattern still stuck to the pumpkin, I went ahead and skewered the white circles of my eyeballs (like literally, with a wooden skewer). You can also use a drill, but I couldn't find mine and this worked fine (after I poked the plastic a few times with the needle to get it started).
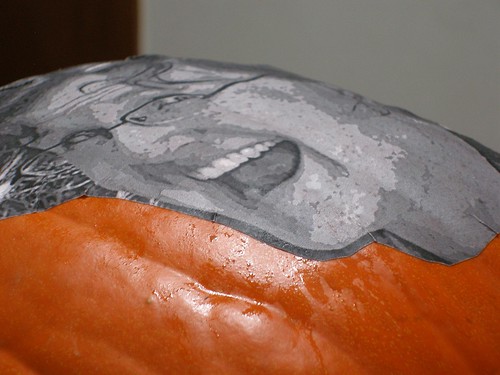
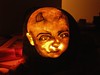
Carving (you can see what it looks like unlit here)
-Leave the skin intact for all black areas. I lightly carved around these using the smallest blade on the lino cutter.
-Remove all white areas completely with the little saw. If the area is particularly small, I'd suggest going around the inside of the line with the smallest lino cutter blade and then following that line with the saw. It'll be much cleaner that way.
-Use the gray areas on the pattern as a guide for how thin to carve the flesh (the lighter the color, the thinner the flesh). This is where the carving tools will come in super handy.
-Once you're mostly done (or having any trouble in a particular area), add some candles, sit in the dark and refine that way. You'll be able to easily see where it needs to be lighter.
-If, overall, the entire thing looks too dark, just take the pottery scraper and from the inside, thin it out evenly.
As soon as I saw this one in the dark for the first time I actually cackled, making exactly the sound that you'd expect to come from someone with eyes like that.
And unless you live with me (or have talked to me on the phone) you have no idea how much this thing cracks. me. up.
ADDED NOTE (Sept 27)- My integrity has just been called into question. And instead of being offended, I'm taking it as the best compliment ever. Yes, it is a real pumpkin. No, it is not a photoshop fake.
But thank you!
--------------------------------
Enjoy this tutorial?
Get more like it by subscribing to my RSS feed
----------------------
Related Posts
Stephen King Pumpkins
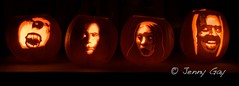
Secret Window Pumpkin

Kam-tastic

17 comments:
WOW that is amazing!! I would never have the patience to do it, but I admire you for doing it! Great job!
Once again - awesome! I can't believe how much patience you have!
And yes, you do look crazed! That's why everyone on FB picked this one! If you had been able to remove the glasses, it would really really look psychotic. It'll scare the crap out of kids if you put it out. You should have a poster made of it that you can put on your door. Oh wait, that might scare all the kids away!
Your patience is astounding. I mean, yes, you look a little wild there, but your face is carved onto an effin pumpkin - who cares! The fact that it looks so awesome is amazing.
Record your voice doing something creepy and put the recorder inside the pumpkin. That'd be funny.
Wow, your hands do look huge!
When I saw the first picture, I thought it was, well, just a picture. Then I scrolled down and was surprised to see that it was actually a pumpkin! Amazing.
"When I informed Jeff, he wanted to know which movie I meant, the sad Eric Stoltz one or the funny Jim Carrey one." LOL!!!
This is utterly amazing. Too cool! I love FinnyKnits' idea of putting your recorded voice in the pumpkin. LOL -- that would be fun.
You impress me mucho! :)
This is just WOW. I can't believe it. I've never seen anything like it before. I'm so, so impressed. I'll be linking to this. Wow, wow, wow.
Holy flip I cannot believe you posses the kind of patience this project requires. Seriously! It's totally awesome, though.
Okay the two year old just walking while I was looking at this and said "Hey, what is that crazy lady doin'?"
That should answer the question.
Wow. That is unreal. I am thoroughly amazed that this is even possible. I like finny's idea about the scary voice. heh.
That is just incredible! I'll be linking to it on Dabbled.org on Friday :)
Dot
Of COURSE you look crazed! As well you should after taking on such an insanely painstaking project!
Besides, I think a jack-o-lantern carving your visage reflecting all the creepiness of a care bear would be counter thematic to All Hallows Eve... no?
Wendy, you are truly amazing. I admire you so much.
This is one of the most amazing things I've ever seen. I may have to try that!! My aunt used to make really cool jack o lanterns. but nothing like that! Wow!
Here's a carving tip. After you punch the holes with a needle, if you cannot see them, make sure the pumpkin is dry and then dust it with flour. Then brush it off with a towel or something. The flour falls into the holes, leaving little white dots everywhere after you brush it off.
Cheers!
Argh! Mine just didn't turn out well. I had all 4 of my kids at the kitchen table and we tried it but haven't gotten great results. I'm going to try one on my own to see if I can get it to work.
Anonymous, just make sure you start with a simple picture with only 3 colors (like the Stephen King ones that I did last year- links are at the bottom of the post). And also remember that the first one of these that I did turned out, um, less than awesome. It takes practice, but you'll definitely get better!
Good luck.
Post a Comment