


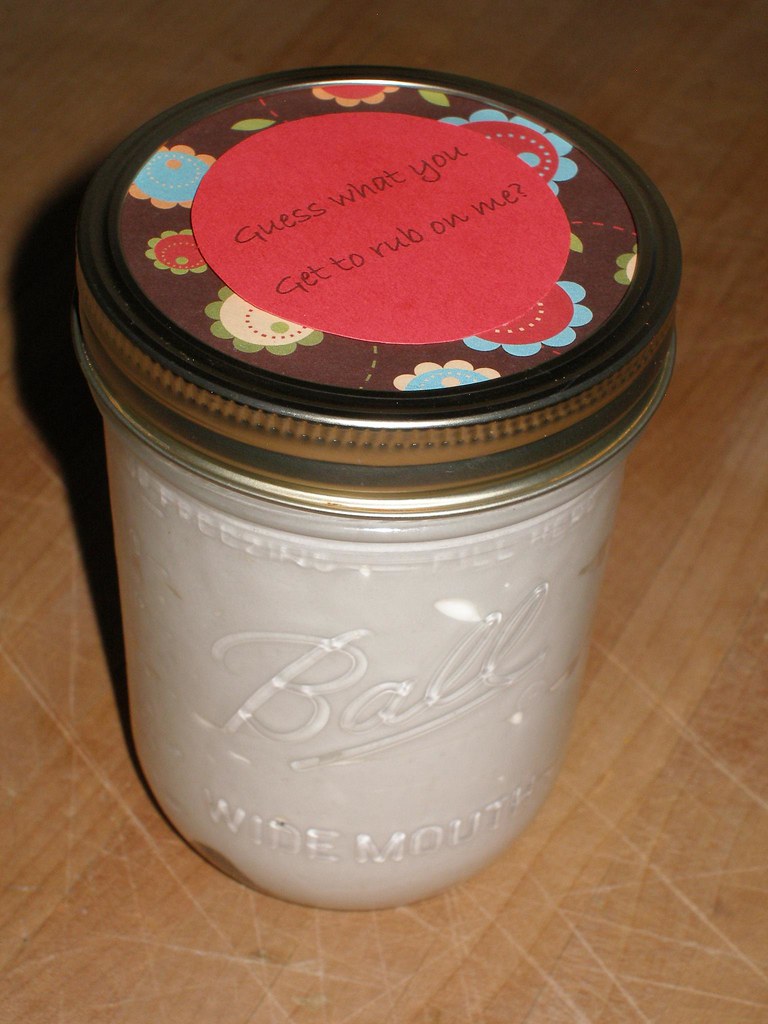
Jenny took this picture to show how dark it was while I was taking these pictures of my whipped body butter. The sun had just set at this point, which where I live in Colorado means that it was completely behind the mountains and giving me no direct light whatsoever.

You Need this Tutorial if...
-you take a lot of pictures of non-moving objects (not people)
-you don't think you have enough sunlight to get decent pictures.
-you have given up hope of having really great pictures, or are holding out for a SLR camera. (Personally, I have an Olympus SP-320)
What You Need
-First thing's first, if you don't already have one, get yourself a tripod. I know, I know... I really resisted using a tripod when I first started taking pictures for the blog too, but let me tell you, now I couldn't live without it. This Sunpak Tripod
-You might also need your camera's manual. If you can't find the paper version, try looking for it online.
Settings To Acquaint Yourself With on Your Camera
-Self Timer (usually looks like this)

-Flash (looks like this)
What To Do
-First of all turn off all the lights in the room. Most light bulbs will give an off color to your photos. It's better to have just a small bit of natural light than a whole bunch of yucky light.
-Now turn off your flash. You may think you need it, but the light from the flash is no good. So push the flash button till you see this icon.

It took me the longest time to realize that it was the flash that was making so many of my pictures look crappy, producing harsh colors and shadows like this.
-Now attach your camera to the tripod. In Auto mode, your camera will automatically leave the shutter open long enough to let in enough light. Unfortunately, in low light conditions, this will be much too long to hold by hand and will be super blurry.

See how much better the color is without the flash, though.
-Now put the camera on Auto Mode, set the timer (it'll prevent any movement that occurs when you depress the shutter button) and take the picture.
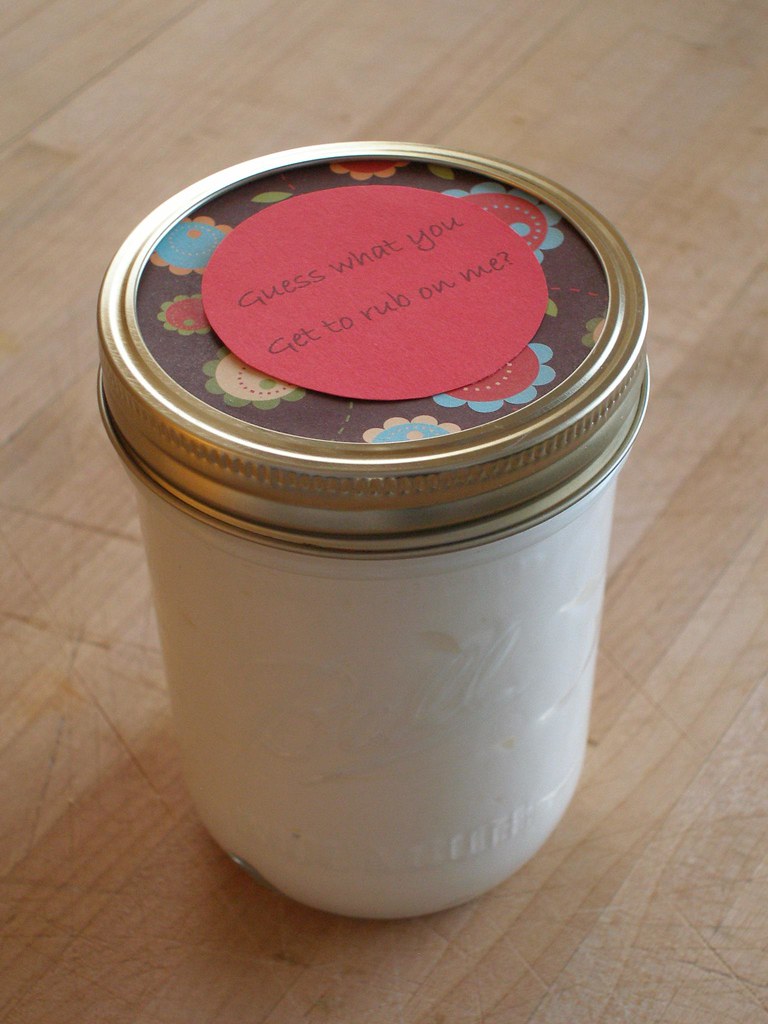
Now I'm not saying that this is the best picture I've ever taken, but considering how dark it was, it's pretty fantastic.
Obviously, the more light you have, the better picture's you'll get. This is a pretty extreme example.
I am occasionally shocked at how nice the pictures turn out when I use this method.
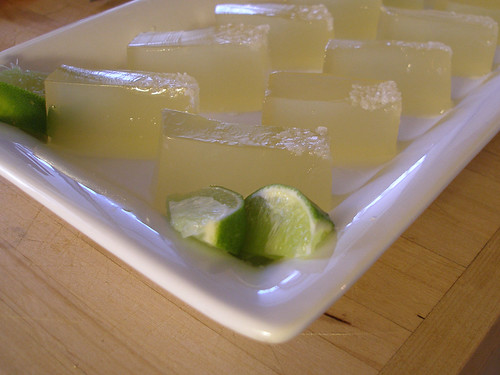
The sun was pretty low, with just a few rays of light making their way through the window when I took this one of my margarita jello. I think this was the first time I realized that I could get pictures with just about any bit of daylight.
And here's another one of my favorite food shots, taken about a half hour before sunset.

(Enfrijoladas)
So, was this helpful info to anyone, or do you all do this already?

23 comments:
Aha! Aha aha aha! Okay, I figured out to turn off the flash. I got that far. I even use the tripod from time to time. But the timer! So the camera is completely still! AHA! Thank you, I think that was the detail I was missing. :)
This is usually how I do it too, although I often try to go without a tripod as well.
A great little tutorial for those who didn't know yet! :)
Thank you! This was very helpful for me, as I recently purchased my first camera and haven't been satisfied with my indoor pictures.
I just found your blog the other day and I love it : )
Melissa
This is going to be VERY helpful! Some of it I already knew, but not all. I am CONSTANTLY taking pictures of random objects for my craft blog. Thanks for the tutorial!
Joanne
http://www.readysetcraft.blogspot.com
well. i knew of those things. but dont think ive put them all together. with such a small amount of light and on auto??? i cant figure out how to turn off my flash on auto. guess i need to find that darn manual.
i really enjoyed this. simple and to the point. thanks!
Thanks to the info you had already given me, I bought a tripod last week and tried the tripod + timer + no flash suggestion and it absolutely helped!! I took a few pics today of an embroidery project I finished last night -- it was overcast & rainy today, but using your tips I managed to get some pretty decent shots. It's nice to have the picture tutorial :).
Hmmm ... I most like the first photo.
I appreciate the shadows which illuminate the jar lid and embossing.
The colors also seem to be more brilliant in the first photo.
So, the first photo gave me a better idea of which jar size/style you used and which paper you chose.
The label text also is easier for me to read in the first photo.
Maybe this is because I have a house with full sunlight as long as any sunlight exists, so everything like this looks "right" to me?
It was sooooo helpful! It helped me remember how wonderful those jello shots were!
P.S.
I love this quote you have up now:
"Everybody is a genius. But if you judge a fish by its ability to climb a tree, it will spend its whole life believing that it is stupid."
-Albert Einstein
I kinda feel like that's my life quote.
CuddlyBunny, that's great that you like the way pictures look with the flash. You'll always be able to get pictures you like.
And I think that some actual sunlight would have produced better shadows in the final picture, but in my opinion, I'd rather have no shadow, than the harsh ones from the first picture. (And I purposely took pictures for this post in a really extreme case, just to show how useful this was.)
Some of my favorites pics come from using this technique when there is still a bit of actual sunlight coming through the window, especially late-afternoon angled rays. That gives some really nice results.
Great post! i'm passing it on to my fellow food bloggers at foodwhirl.com (have you checked out the new site yet? I'd love to have you do a guest post!)
dot
Awesome! thank very, very much for the tip. I have been struggling with having to take all of my pics in the morning when there's good light. Looks like I just need to find a tripod.
I'm glad you posted that. I've spent a lot of time waiting on perfect lighting to avoid the flash. Now I need to figure out how to set my camera on auto with the flash off.
Yes, thank you! That was very helpful!
Thank you, thank you, thank you! I've been taking pictures of my sterling silver jewelry for my etsy site. I've been having some luck with using natural day light. But, now I am going to take out my tripod. The self-timer idea is GENIUS! Thanks SO much! This should definitely help me take better pics for my new business.
I just subscribed to your blog and look forward to more wisdom from you.
Do you have any tips for photographing thing that shine/produce glare?
www.StinkerAndSpike.etsy.com
I'm so glad that so many of you found this useful.
Stinker and Spike, as for photographing shiny things, I think trying this method with very little direct sunlight might do the trick. If not, I'd use something to diffuse the light before it hits the object, like a white piece of paper or sheet.
Very helpful! Thanks so much! I have been taking pictures without flash for awhile, and have found that they are better. I also use Picnik.com to edit, it helps a lot with light. I wasn't aware of the tripod idea though, I'll have to check it out.
Do you know of any posts or classes to learn how to set up your food shots to make them more interesting?
Thanks again!
~Liz
Thank you Thank you Thank you!!
This just may revolutionize my blog - I've not taken many pictures because they always turn out terrible. I linked to this on my weekly roundup in the hopes of helping others! :>) Thanks so much for sharing -
Super helpful! I have to take most of my photos in low light with my crappy camera because by the time I'm done working, the sun's about gone. This will make a huge change! Thank you!
Lise at inthepurplehouse dot blogspot dot com
so helpful. thank you for taking the time to do this. i had given up photographing food when there's no daylight. it just turns out looking exactly NOT delicious. the tripod is the trick. and the timer. i never use either, though i do have a tripod.
there is no fancier camera in my future, so this is a real gift. thanks again.
Well I have been wondering why everyone gets these perfect looking pics...I always thought they used some fancy Photoshop technique. HA! Well I really appreciate this post! I happened to stumble across your blog through tipnut.com and haven't stopped reading yet! I love it!
Very helpful! Thank you for sharing!
Post a Comment