I received quite a few questions about the
henna pictures, so I thought I'd answer them all here.
The first time we tried this (on my pregnant belly), we mixed our own batch using a traditional Indian recipe and bulk henna from the health food store. After we applied it, I had to keep it wet for hours by continually dabbing it with a sugar and lemon solution. And after all that work, it hardly stained at all.
Sad.
We have since found Earth Henna kits. I think they're so much easier and a lot more fool proof. We buy ours locally (just about all the health food stores around here carry them), but if you can't find them in your area, you can always get them online. The kits come with everything you need to create a lot of tattoos, including the transfer sheets if you don't want to do it freehand. And you don't have to keep them wet, which is a total pain.
Added Note- As mentioned in the comments, this product does contain black walnut, which would obviously cause a problem for those people with
nut allergies. I'm very grateful to the commenter for bringing it up because it is something that didn't even cross my mind (having a family without any allergy problems what so ever).
For those of you who don't have allergic issues...
I am copying in pictures of each of these and adding little descriptions because every time I go to buy them, I forget which one is which (some kits make more designs than others and one is just a refill) and the descriptions all sound the same. I have the same problem with buying these that I used to have with Ranch dressing at the grocery store; I somehow always ended up with bacon flavored when I only wanted plain. ... Not that any of these are bacon flavored.
Humm, kinda got off track there.
Anyway, here are all the different kits that I, personally, recommend. There are plenty of other ones out there that I haven't tried. And many people (like the millions in India) are perfectly capable of mixing up their own batches themselves. If you're more competent than me, you should give that a try.
Earth Henna® Body Painting Kit

This is a mini kit has enough for 15 to 20 designs.
Original Earth Henna® Body Painting Kit

This has enough to do 30 to 40 designs.
Earth Henna® Body Painting Kit and Mehndi Book

This contains the Mini Kit (15 to 20 designs) plus a book of designs.
Lakaye Studio - Refill - Earth Henna Body Painting Kit

This is a refill kit that has enough for 30 to 40 designs (and the one I always intend to get, but sometimes I end up with something different).
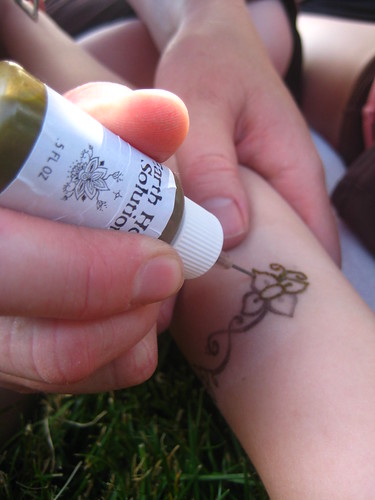
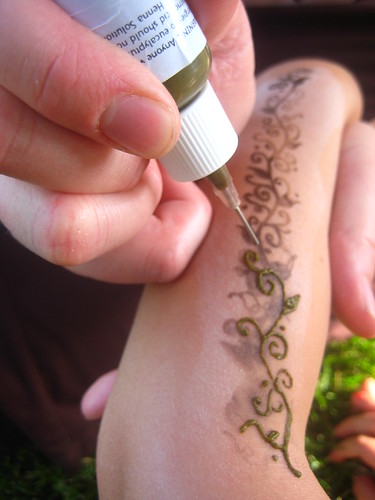
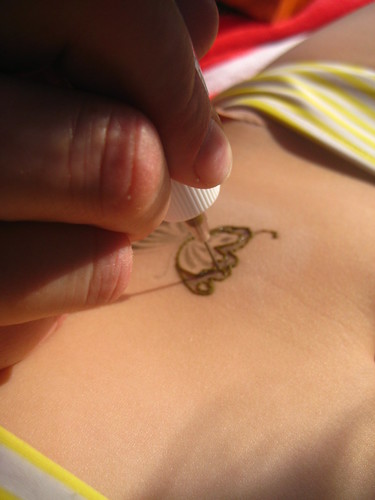
The Process We Use-Heat the skin where the design will go. (optional- see below*)
-Transfer design (if using) by placing ink side down on skin and rubbing eucalyptus oil over the top, holding the paper perfectly still while you do it. Do this step as quickly as possible because it tends to smear. (It's much easier to do on a flat part of the body.)
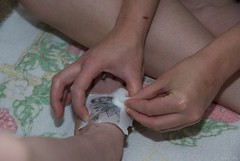
-Apply henna to skin, using nice thick lines.
-Don't move much until it is dry to the touch.
-Leave it on the skin at least 2 hours and up to 6.
-Soak a cotton ball with cooking oil and dab it all over the henna design.
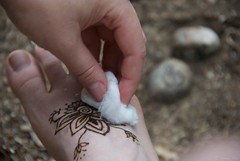
-Let sit for a minute or two and then rub the skin with the cotton ball, loosening and removing the henna.
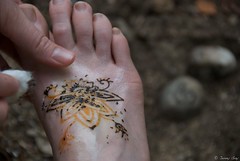
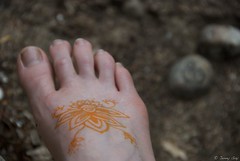
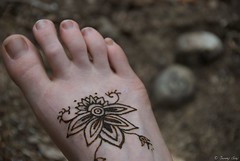
-The color starts out as orange, but darkens to brown within a day.

-Avoid water for 24 hours if you can.
(Thanks,
Jenny, for the photos and the use of your foot.)
Tips*We've had really good luck with using a microwaved heating bag (you know, filled with corn or rice or lentils) to heat the area just before applying the henna. This helps the henna to stain darker and last longer, but is certainly not necessary.
-The skin should be clean and free of lotions before starting. It also helps if you rub the area vigorously with a towel to buff away any dead skin.
-Henna stains darkest (and lasts longest) on the feet and hands (unless you hand wash a lot of dishes), but it will work anywhere on the body.
-If you're squeezing out a line of henna and it stops, DON'T squeeze harder, unless you want a big glob on your design. On a piece of paper, attempt to squeeze it out. If it doesn't come out easily, use a straight pin to clear the tip.
-The longer you let the dried henna sit on your skin before removing it, the longer it lasts.
-Don't go to sleep with the dried henna still on your skin, even if you wrap it with tissue paper like some books recommend. It will crumble off and fill your bed with little henna crumbs... which stain.
-Whenever you need to get the area wet, you can rub oil into the area first to protect it a bit. This will help it last longer.
-If you would like to make up your own designs to draw from directly, just print them up on a laser printer and use just like the included transfer designs.
-If you do want to make your own designs, my favorite books for inspiration are
Mehndi: The Art of Henna Body Painting

(This is actually the book that comes with the kit above)
Mehndi : The Timeless Art of Henna Painting

(This one has some gorgeous designs.)
Important NoteBeware of Black Henna. It is sometimes made with a really toxic chemical (PPD) which can burn the skin.


