"Anyone that doesn't agree with leggings as pants can physically fight me.
And I'm going to win because I have a full range of motion due to the fact that I am wearing leggings as pants."

Wednesday, October 29, 2008

Pumpkin Carving

Look what Jenny and I did yesterday.

DSC_4338.jpg

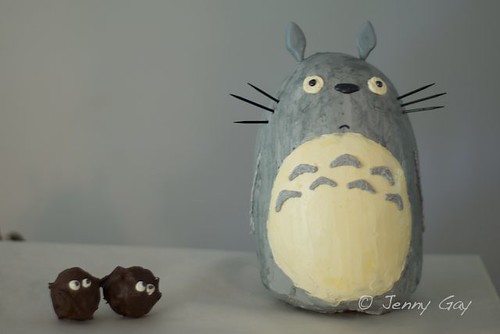
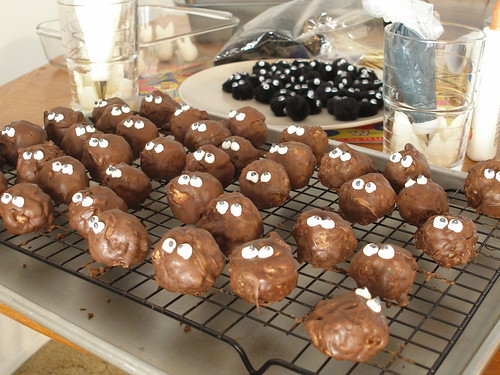
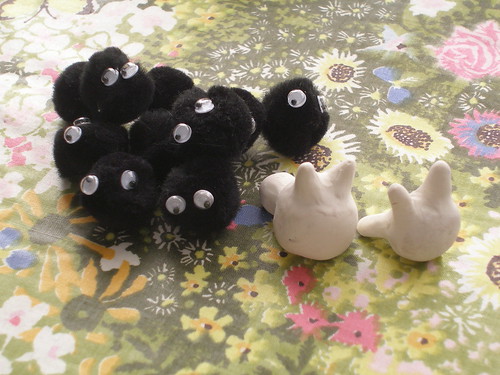
Can you tell who they are?

Added Note- Since everyone's having such a hard time, I'm thinking of giving the extra incentive of a prize. The first person to figure it out wins an aromatherapy necklace.

(The answer as well as a fifth carved pumpkin can be found here.)

I’ve been thinking about carving these particular jack-o-lanterns for over a year, even before I carved this little guy on a watermelon. Since these were relatively simple (with only white, black and 1 shade of gray), the actual carving part (minus the cleaning out and scraping) took just about an hour per pumpkin.

DSC_4349.jpg

We've finally built up a pretty handy little collection of tools, which makes the whole process go much smoother.
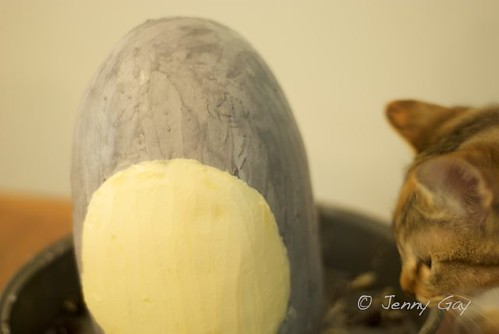
-For cleaning the inside of the pumpkin (as well as scraping it down to a good thickness) ceramic loop tools or pottery scrapers work really well.
-We mark the design with a regular push pin.
-We use the little saws from the pumpkin carving sets to cut out the pieces, though I'm thinking of making something like this for next year.
-For refining the depth of the design on the areas with the skin removed (thinner equals lighter) cheap wood carving tools or a linoleum cutting set work really well.

DSC_4359.jpg

The night that I came up with the idea for these designs, I sat up late, searching the internet for the right pictures to use. Every time I opened up a picture of the guy on the left, I would hear a sound from the kitchen. The sound was a minor one, something like the house settling, so I didn’t pay attention at first. But as I clicked into the various pages, there it would be again and again.

Eventually, I noticed it and I started to freak myself out. It was at this point that I realized that it was well after one in the morning and I was the only one awake in the house. And here’s the thing, I was actually unable to get myself to stand up from the computer and walk down the hallway to the bedroom. To do that, I’d not only need to walk past the kitchen where the noises were coming from, but also our sliding glass door and I was pretty sure that I hadn’t pulled the curtains that night.

I thought about calling for help, “Jeeeeeeeff, honey, please come and walk me to bed.” But I really didn’t want to admit how freaked out I was. So, I opened up an audio book and listened to it for, honest to God, another hour before I had distracted myself sufficiently to be fairly confidant that I could walk down the hallway instead of running at a full sprint, giggling and squealing like a little girl.

----------------------

Related Posts
Kam-tastic (this one's on a watermelon)
2007 10 04 056
Secret Window Pumpkin
PA310018
Crazed Self-Portrait Pumpkin
P9230008 copy2

Monday, October 27, 2008

Fine Art from the Recycling Bin

For the last year I've been reading all over the internet how #6 recyclable plastic works as shrink plastic material (you remember Shrinky Dinks?). And I figured that the girls' birthday party would be a perfect time to try it out, since we almost always plan some sort of craft to do.

For those of you who are interested in that sort of thing, I'm including a simple tutorial.

PA220007

Click here to see the giant picture of everything we made.

How To
-Cut out a relatively flat piece of clear #6 plastic.
-Sand one side using fine grit sandpaper (we used 220).
-Cut out your design, either with scissors or if you're not too particular about your punches, use those. (I did get a piece of plastic irretrievably wedged in my sun punch so I think I'll be sticking to scissors from now on out.)

PA220002

-Color them on the sanded side using either colored pencils or thin sharpie markers.

DSC_2738.jpg

-Punch any necessary holes BEFORE you cook them.
-Cook them in either a Shrinky Dink oven, a toaster oven or your regular kitchen oven (325 for between 1 and 5 minutes- or about 30 seconds past when they shrink and flatten back out).

DSC_2796.jpg

-And I should mention that not all of the number 6 plastic works. So far, the only ones we've had success with was clear #6. The black #6, not so much. Those dustbunnies above were the second try where we colored the clear plastic with black colored pencils.

They worked so well that even the adults got involved.

DSC_2932.jpg

DSC_3032.jpg

This last one was done by our friend Allison, who unsurprisingly also happens to be a fantastic artist.

And to round out this post, I'm including links to more fun ideas of what to do with your little melted pieces of plastic.
-Wee Wonderfuls: Shrinky Dink Pins
-Elsa Mora: Buttons (I love this idea so much. Imagine... homemade buttons.)
-Craftlog: Spirograph + Shrinky Dinks = Nostalgia Overload
-Craftster: Shrinky Math (This is some impressive jewelry.)
-Planet June: Ring Tutorial (This one looks especially cool, but I haven't had the guts to try it yet.)

--------------------------------

Enjoy this tutorial? Get more like it by subscribing to my RSS feed

Thursday, October 23, 2008

Totoro Party #4- Totoro Cake

For those of you who are still here with me this week, here's the Totoro cake. Isn't he freakin adorable?

DSC_2708.jpg

I made the base out of Scotcheroos (Are you tired of hearing that word yet? 'Cause it's starting to sound all weird to me. Like when you repeat something over and over til it loses all meaning. And it had already started out fairly strange to begin with.) He's mostly just cake and buttercream. The ears are gumpaste and toothpicks. The whiskers are toothpicks colored with black gel food coloring. And his nose, eyes and mouth are royal icing.

PA130008

Anyway, I made this bottom part and then Jeff made several chocolate cakes. Then I cut them into circles and layered them on the bottom with buttercream. Now here's the genius thing about using buttercream... it's all soft and easy to spread when you put it on, then you can put it in the fridge overnight (or just a couple of hours if you're really short on time) and it will totally firm up. This makes it so much easier to carve because, you know, the layers won't be all sliding around on you.

I had the cake all put together and carved and even had the crumb layer on. (Does everyone know about the crumb layer? That's another brilliant thing I've discovered within the last year or so. You frost the cake thinly and it's a total mess, but then you put it in the fridge and, just like magic, the buttercream hardens up and seals in all the irritating pieces of cake that want to keep working their way to the surface. And they're trapped. And you can spread another layer of buttercream on and it'll be crumb-free. And what's best is that you then get an extra layer of buttercream, which is so so yummy.)

DSC_2683.jpg
(Isadora wanted to help.)

--------------------------------
Related Posts-
Totoro Party #1- Scotcheroo Recipe
Totoro Party #2- Dustbunnies
Totoro Party #3- Catbus
Fine Art from the Recycling Bin

Wednesday, October 22, 2008

Totoro Party #3- Catbus

So did I mention how much I love Scotcheroos? And did I also happen to mention what good luck that is? Because I made countless flippin batches of this stuff over the last week. I would say about half of it went into the Catbus. I know that those of you who've never seen My Neighbor Totoro are just wondering what the hell I'm going on about, but it's one of my favorite movies. Really, go see it. Even if you don't have kids.

PA180024

Oh, and an interesting bit of info... it wasn't until I started looking around for Totoro images for inspiration that I found this, which really cracks me up for some reason. Maybe because I have the maturity of a 10 year old. And just for the record, our Catbus was not anatomically correct. In fact, the more observant of you may have noticed that he doesn't even have legs.

At first we were planning to just make the top part of the bus out of the Scotcheroos and put it on top of a couple layers of cake. And it was Jenny's brilliant idea to form the top part over a greased up loaf pan. However, at about 10 o'clock the night before the party, not only did it completely squash the cake when we put it together, but part of the top started to fall apart as well. (I guess that's another Don't Do What Donnie Don't Does- don't put the heaviest part of the cake on top. Doi.)

So, after Jeff and I sat staring silently at the cake for about 10 minutes, trying to figure whether to just scrap the whole thing, I went to the store to buy my third giant box of Rice Krispies in a week and we put that sucker back together. This time, using the Scotcheroos for the entire thing.

DSC_2663.jpg

Beyond that, the most difficult part was getting the head to stay up. So we decided not to. We just left it in the cake pan and used the sides as support.

PA180014

Kenzie even piped "Happy Birthday" on the destination sign, which I think might possibly be my favorite part of the whole party.

PA180012

BTW, for anyone attempting this, the sign, eyes, nose and teeth are all made out of gumpaste. And the piping was done with royal icing.

--------------------------------
Related Posts-
Totoro Party #1- Scotcheroo Recipe
Totoro Party #2- Dustbunnies
Totoro Party #4- Totoro Cake
Fine Art from the Recycling Bin

Tuesday, October 21, 2008

Totoro Party #2- Dustbunnies

I think that my favorite characters in the Totoro movie are the Dustbunnies. They're called Makkuro Kurosuke in Japanese and the actual translation would be "Pitch Black Blackies." They're essentially little black soot spirits that live in old houses. Calling out and laughing loudly seems to get rid of them. And if you want to keep them around, they eat little star food (like in Spirited Away).

We made two different kinds of dustbunnies for the girls' birthday party.

PA180011

The edible ones were made of Scotcheroos, which we coated in melted chocolate then piped the eyeballs on with both white and black royal icing.

Joey and Kenzi made the other dustbunnies out of black pom poms, white glue and google eyes. These were the party favors, along with little Chibi-Totoros that Joey made out of Sculpey.

PA210005

And the girls made the giftbags (using this tutorial) with paper that Kenzi designed and printed up.

PA190031

And stay tuned. Tomorrow I'll have pictures of the Catbus.

------------------------------
Related Posts-
Totoro Party #1- Scotcheroo Recipe
Totoro Party #3- Catbus
Totoro Party #4- Totoro Cake
Fine Art from the Recycling Bin

Monday, October 20, 2008

Totoro Party #1- Scotcheroo Recipe

This past weekend, we had a party for Joey's and Kenzi's birthdays (10 and 16). They have always loved Totoro, so that was the theme for this year.

The problem I ran into when forming the Totoro cake was the fact that the top of the cake cannot be bigger than the bottom or it will go all slumpy. When you need to make a cake like that, though, you can to use some other form of support for the bottom part and then stack the rest of the actual cake on top.

I chose to use Scotcheroos and they worked perfectly to help provide structure to the cake. Scotcheroos are something my mom used to make. They're essentially Rice Krispie treats with peanut butter instead of marshmallows. (And I'm pretty sure that the reason for the name is that you're supposed to coat these with melted chocolate and butterscotch chips, but I rarely do because butterscotch chips are gross.)

PA200001
(For now, I'm just putting up a picture of what traditional Scotcheroos look like; I'll show you the cake later in the week.)

Ingredients
1 cup of light corn syrup
1 cup of sugar
1 cup of peanut butter
6 cups of Rice Krispies

Instructions
-Combine the corn syrup and sugar together in a fairly large pot and heat over medium heat, stirring often.
-When the mixture begins to bubble, take off the heat and stir in the peanut butter until it is well mixed.
-Stir in the Rice Krispies with a folding motion, making sure to scoop all the peanut butter up from the bottom.

Now you can do one of two things. Press the mixture into a well-buttered pan using a buttered spoon or your hands. Or butter up your hands and very carefully begin to mold it into whatever shapes you want. Just be careful 'cause this stuff is pretty hot at first.

It tends to slump when it’s still warm, so you can either keep reforming it, or wait until it’s cooled a bit more. The girls were able to form a lot of the Makkuro Kurosuke (or dustbunnies) themselves.

And since this party involved so many different things, I've decided to do a little series for it (as opposed to one ginormous post).

--------------------------------
Related Posts-
Totoro Party #2- Dustbunnies
Totoro Party #3- Catbus
Totoro Party #4- Totoro Cake
Fine Art from the Recycling Bin

Saturday, October 18, 2008

Bloopers

You know, I like Martha a lot more after seeing this.


I think her show would be so much better if were more like her blooper reel. They must just edit out all the really interesting stuff.

'Wooly, hairy balls' indeed.

Friday, October 17, 2008

Thoughtful Friday- Meditation

PA130006


Meditation is a process of lightening up, of trusting the basic goodness of what we have and who we are, and of realizing that any wisdom that exists, exists in what we have already. Our wisdom is all mixed up with what we call our neurosis. Our brilliance, our juiciness, our spiciness, is all mixed up with our craziness and our confusion, therefore it doesn’t do any good to try to get rid of our so-called negative aspects, because in that process we also get rid of our basic wonderfulness. We can lead our life so as to become more awake to who we are and what we’re doing rather than trying to improve or change or get rid of who we are or what we’re doing.

- Pema Chodron in The Wisdom of No Escape and the Path of Loving Kindness

(Quote originally found at Throwing Marshmallows.)

Note- I just thought I'd mention that as I was looking through pictures to find a nice one to go with this quote, I found this one of Joey. She isn't so much meditating, as sitting quietly on top of the heater vent in a dress up dress, staring out the window. I think it pretty much sums up the meaning of the quote, though.

Wednesday, October 15, 2008

Love Your Body

Hey there. How’re you all feeling in your skin today?

I’m asking because today is Love Your Body Day. It’s sponsored by the National Organization for Women and its aim is to overcome negative body stereotypes. So, if you are normally critical of your body, just for today, I’m encouraging you to really make an effort to love it and appreciate everything it’s done for you. ‘Cause I bet it’s done a lot.


(Image created by Whitney Calvert of Linesville, Pennsylvania)

Really. Just stop for a moment and focus on and create a feeling of love in your chest. Now spread it out to your entire body. Doesn’t that feel better? How long do you think you could carry that feeling with you?

If you’re interested, you can go here for more suggestions of things you can do to celebrate your body. You can also look through all the posters and maybe even make one of your own to enter in the contest for next year's Love Your Body day.

Here’s my own personal love my body story.
At one point in my life, I stopped buying and reading women’s magazines and catalogs. As a teenager, I’d read them all and sometime in my 20’s, they just stopped being interesting to me. And then one day, after many years (including the birth of my daughter), I picked up a Victoria’s Secret catalog and was shocked. Who were those scrawny women with huge tits? They honestly looked like freaks to me. First of all, no one that incredibly thin has boobs that big. Secondly, and most importantly, they didn’t look like me. And my naked body was the only woman’s form that I’d seen in years. As far as I was concerned, my body was what a woman’s body looked like. Those *ideal* bodies looked weird and unnatural to me. And they certainly weren’t attractive.

At that moment, I felt like cheering. Ha ha, Madison Avenue, MY body is the standard, not your models’. And I don’t want any of your stuff ‘cause I don’t need it. I’m gorgeous just as I am. Suck on that.


Can I get an Amen!?

Tuesday, October 14, 2008

Pronounce This

Jeff recently installed a pretty nifty little Firefox add-on. It’s called Pronounce This. It will pronounce most words on any web page. After you’ve installed it, you can highlight the word, right click it and then choose the Pronounce option.

It’s super helpful for Joey to have access to this. She learns quite a bit on the internet and especially for scientific sites like this one, it can be pretty handy. It doesn't have all the words we've come across, but it can handle the majority of them, including Lagrangian.


Also, here’s a relevant shortcut that I love to use... To highlight a particular word, double click on it. If you triple click, it will highlight the whole line.

Monday, October 13, 2008

A Few Random Things About Me- 41 thru 45

It's been awhile since I've done one of these, so here's a few more.

45- I am almost physically unable to bite into a whole cherry or grape tomato. I once bit into a bad one, and it was so awful that I’ll forever have to cut them in half first, just to check that it isn't all nasty in there.

44- I accidentally wore my homecoming dress backwards. It’s not like it had a zipper or anything; it was the same in the front as the back. But as I was sitting at the restaurant before the dance, I looked down and realized that the tag was in the front. I started giggling and had to go to the bathroom, redress myself and repin the corsage... which had been hard enough to get on in the first place. What’s funny is at the time I was embarrassed, but if something like that happened now, it wouldn’t faze me. I often find that I’ve walked around all day with my shirt inside out.

scan0001
(Note- Comic face added for privacy reasons, not to mock anyone.) See right here, in this picture, my dress is actually on backwards and I hadn't realized it yet. And you can't really see them, but I'm wearing opaque green tights in this picture. I loved those things. Actually, I loved that whole outfit; the velvet jacket had been my grandma's.

43- In high school I was given a Dictionary with my name engraved on it in gold. I believe it was because of my cleverness. Or something. Or maybe it was because I almost always wore my clothes the right way round.

42- I always thought that Lindsey Buckingham was a woman. And not just because of his name. I thought he sounded like a woman too. I guess I'd never seen a picture of the guy.

41- When I feel sick, the only thing I like to eat is KFC's mashed potatoes and gravy. The less like real food it tastes, the better.

Yah, I know.

Friday, October 10, 2008

Thoughtful Friday- Writers Block

The problem isn’t figuring out what to write about (because my brain is always swirling with ideas), it’s getting the thoughts from my mind down into a more concrete form.

If I just sit down at the computer with the intention of writing something, usually nothing comes. The good ideas are more likely to come at inopportune moments, while I’m doing something else, like weeding, or laundry or most often, snuggled up in bed... those quiet moments when I can think. Then, somehow when I sit down to write, it’s surprisingly difficult to extract those jumbled thoughts bouncing around in my head and turn them into something even remotely coherent.

I could never get the totality of it out. It isn’t even that it’s stream of consciousness. That implies one long path. This is more like branches of consciousness, where one word in any one thought could spawn 8 new thoughts all flying off in their own direction. And it’s almost like I’m able to think them all at the same time. I don’t know if this is unique to me, or if we all experience monkey mind to this extreme degree.

To make my point, none of this is what I was thinking about this morning just as I was about to get out of bed to fire up the computer. This was when Joey came in looking sad because she’d had a bad dream.

As I lay there, cuddling her, I tried to repeat the seemingly important thoughts to myself so as to etch them in my memory. Then I realized that the moment of her needing this from me was a fleeting one and I should enjoy it while I could. Every day I read so many reminders from parent bloggers to really appreciate this time because it flies by fast. It has almost become a cliché. And it would be, except for the truth of it. A truth which I should probably understand more than the others. Most of them have kids that are still little, babies even. Our youngest is almost 10, our oldest is 18. Believe me, I know how quickly it’s gone. Much of it already is for us. One moment, you’re just hoping to survive the nights when you get no more than 90 minutes of sleep at one go, the next they’re moving out to live on their own.

P3220051
(Joey and her big sis, Kenzi)

But, for now, Joey needs my arms to comfort her, so that’s what I do. And I do it without letting my mind be somewhere else. I focus on the sounds of our breathing, hers, faster and shallower than usual, because of the terror of the nightmare, mine, working to be slow and measured, in an effort to quell my impatience to be capturing the quickly fading thoughts in writing.

This is my meditation.

I calm myself in order to help her do the same. I can feel myself slowing and grounding and allowing her to learn that from me.

That, for me at least, is being a parent. I can’t remember one word that I’d planned to write. And I’m fine with that.

Tuesday, October 7, 2008

Cooking Resources- Favorite Tools

Over the years, Jeff and I have built up a fairly well stocked kitchen, tool wise. Here are my favorite, most essential tools. I've narrowed the list based on how often we use them (usually more than twice a week) and how much easier they make my life.

PA070001

Braun Hand Blender- Jeff bought this several years ago, and we haven't used our regular blender since. In fact, I recently gave it away to a friend. We use the immersion attachment for smoothies and soups and refried beans. And we use the blender/ chopper attachments for sauces, marinades, salad dressings and even baby food. Jenny bought the Cuisinart version of this and was pretty disappointed with it because it just doesn't get things as smooth as ours does (though it does look sleek in that stainless steel way). The link above is for the model that is almost the exact one that we own, but according to the Amazon description it seems to be missing the larger blender/chopping bowl. Although, the pictures on the front of the stick show all the correct attachments. I've also read great reviews of the KitchenAid® version, but it's more pricey. We use this almost daily.
Added Note- I just checked the price on this thing on Amazon, and it has quadrupled since I posted this (was originally like 60 bucks, now it's $250). Not sure what's going on there. It looks like the Kitchen Aid version is much cheaper right now.

Rasp from Lee Valley- This was one of the first "high end" kitchen accessories that we ever bought. At least it seemed high end at the time (20 bucks from Lee Valley, a company that I adore). I love this thing. We use it for citrus zest, and ginger and Parmesan. It's crucial if you want to grate whole nutmeg. And it practically liquefies garlic. Just watch your fingers; I've grated fingernails into dinner on more than one occasion (though that usually only happens when I'm drinking and cooking at the same time).

Fagor 2-by-1 Pressure Cooker Set- This is the exact model that we own and it comes with two different sized pans and a pasta/steamer basket. However, this version (Fagor 10-Quart Pressure Cooker/Canner) contains just one of the cookers and looks to be about 40 bucks cheaper. Before we bought our pressure cooker, we discussed the pros (quick cooking means less energy and less of our time) and cons (price and storage space) for months. One day, Jeff just returned from errands with one, ending the debate. We've used it almost once a week (sometimes much more) ever since. It makes an amazing pot roast (never dry) and can cook a whole chicken in about half an hour. We use it for stocks and stews and beans and curries and even rice (because we cook our rice like pasta and drain off the water). We use it lots in the winter, but it's also fantastic in the summer. It doesn't heat the kitchen up much because once it gets up to pressure, you set the stove to a fairly low temperature. And, because everything is trapped within, it doesn't put out as much heat as regular methods. Also, you can actually turn the stove off about 10 or 15 minutes before it's done cooking, and let the pressure come down naturally (or conversely, take it outside and release the pressure there, so the heat is outside your house, not in). It's because of this that Fagor participates in the Energy Star program.

Good Set of Knives- We have two kinds... Global and (somewhat surprisingly) Cutco. When Jeff first bought the Globals, I was terrified of using them. I'd used dull knives (which need a good amount of pressure in order to cut anything) my entire life and was terrified I'd chop my finger off. Then I cut potatoes with them and I almost squealed with excitement. If you keep them sharp, they will serve you well and make preparing food so much easier (and quicker).

So, tell me, what tools can you absolutely not live without?

---------------------------

Related Posts
Cooking Resources- Cookbooks
Cooking Resources- Around the Web

Friday, October 3, 2008

Are You Registered To Vote?

I've included two clips from the movie Iron Jawed Angels, which is based on the true story of the suffragists who sacrificed so much in order to earn American women the right to vote. They were jailed because they were picketing the White House and were charged with obstructing traffic.


(link)

For this second one, you might want to stop watching at about the 2 and a half mark if you're squeamish. It's worth watching at the beginning, though, because of the beautiful and inspiring song. I'll be singing it as I fill out my ballot.


(link)

I'd like to provide some info about voter registration for my American readers. IMPORTANT- Many states have deadlines in the next day or two.
-Last days to register to vote (by state)- Click Here
-Links to the various voting processes (by state)- Click Here
-At the top right of either of these pages is a red link that says Register To Vote. Click it to bring up an online form. Some states allow you to check your registration online. Most let you register online and some require you to print out the form, sign it and mail it in.
-If you really want to help your candidate (as well as be absolutely sure that your vote is verifiable in the case of a recount), request an absentee ballot. You don't have to stand in line and can take as long as you want to fill out the form, while sitting in the peace and quite of your own house.
-Another great resource is Project Vote Smart. This non-partisan site also has information about voter registration as well as voting records, biographies and interest group ratings for the various candidates.

Wednesday, October 1, 2008

Book Review- Molly Moon

Joey wrote up the following review based on a series of books by Georgia Byng. If you're interested in this sort of thing, please let us know and we'll include more.


Molly Moon is a fantastic character and I personally like the books because I can relate to her and at the same time we are almost nothing alike, and that makes it interesting to read about: two dazzling green eye, a pug and hypnotism. Byng paints a beautiful picture in my mind and I think you should read it and see this painting too.

Book 1
Molly Moon's Incredible Book of Hypnotism
Book 2
Molly Moon Stops the World
Book 3
Molly Moon's Hypnotic Time Travel Adventure
Book 4
Molly Moon, Micky Minus, & the Mind Machine