This is the first of this year's Halloween decorations. I've been thinking about making this ever since I did The House That Stubbornness Will Finish, By God.
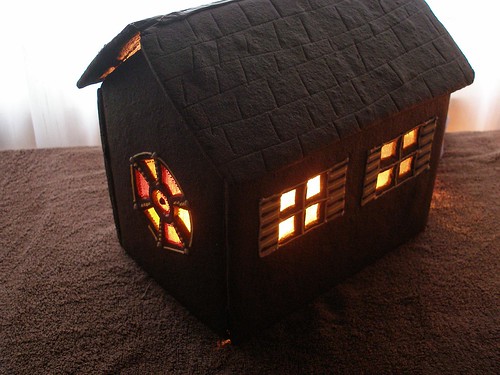
Here is what I've learned since February.
Tips
-We built the house out of cardboard first (actually empty cereal boxes), then took it apart and used the pieces as templates for cutting the dough.

-I learned A LOT about piping from the book Cookie Craft, which I checked out from the library, and will probably be purchasing before the holidays. It has all kinds of fantastic info about creating gorgeous cookies, some of which I used for this project, most of which I haven't even tried yet.
-To make the walls stronger (the first batch crumbled), I kneaded in extra flour (about 1/2 cup) for about 5 minutes, because if you want soft cookies, you shouldn't mix it too much and should add as little flour as possible. I thought in reverse. And because the pieces were so big, I also cooked these way longer than the cookie recipe called for, 40 minutes instead of 16.
-Be patient. Be patient. Be patient. It wouldn't be a bad idea to make this over the course of a couple of weekends. One for baking everything and melting the stained glass. And one for piping the decorations and putting it all together. (So as to avoid sliding icing and crumbling foundations.)
-Don't bother melting and breaking up the candies until you're ready to fill the windows because after they sit out for awhile, the pieces stick to each other something fierce and are really difficult to get out of the bowl.

(This technique for doing the stained glass cookie windows is so fantastic. It makes the whole process so easy. You don't need to cook sugar or crush candy or make a mess.)
-I figured out an awesome trick for keeping the roof pieces from sliding off. Really awesome. In fact it is quite possibly one of the most clever things I've ever thought of.
Which I suppose puts my life in perspective.
Bake two long skinny pieces (these don't need to bake as long as the other big pieces) that are an inch or two shorter than the side wall that the roof piece will be overhanging. Ice them to the underside of the roof pieces like this.
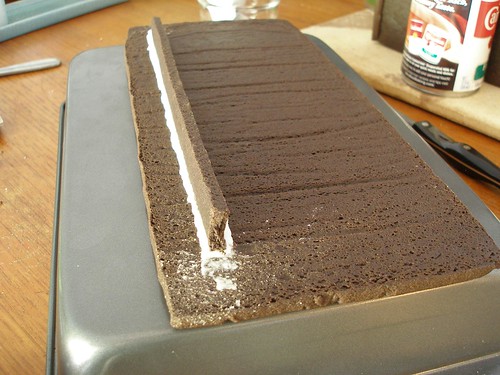
After the 4 walls are iced together and hardened to a cement-like state, glue the roof on with icing, resting the skinny piece on the top of the wall.
This technique worked almost perfectly for me. I say almost because there were some issues with length and placement of the supports, which resulted in some unsightly gaps under the eaves. But as I've said before, when learning a new technique, I like to start on something for Halloween, because then the breaks, tears and gaps all add to the shabby charm of the season.
-If you're going to light it up like I have, use either LED lights or a fairly short strand of regular Christmas lights. When I had this thing all lit up, Joey walked into the room and announced It smells like burning chocolate in here. (I'd used a pretty long strand of lights all wound up and shoved in there. Reducing the number of lights got rid of the problem.) So, you know, just something to think about.
And, yah, I think I went a bit overboard with this part.
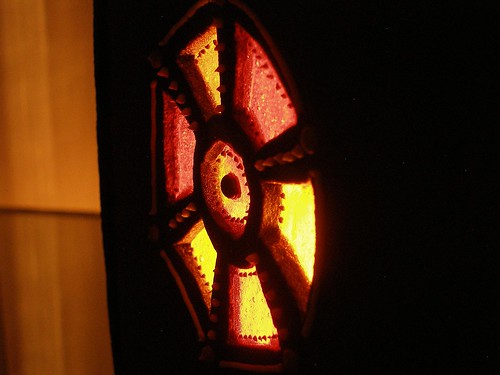
But, I totally couldn't help myself.
--------------------------------
Related Posts-

Valentine's Day Stained Glass Cookies

Valentine's Day Gingerbread House

Crushed Hard Candy

Stained Glass Cookies Flickr Group


11 comments:
I love these cooking crafts. I think that I will be inspired by this one, and make something Halloweeny. Thanks for the idea.
We are busy planning a big event with Hell's Gate Airtram, Yale Historic Site and the Pioneer Cemetery, (the high school drama club is dressing in 1850's costumes and doing skits in the cemetery by lantern light) Then Rich and I have a big party ourselves. Too bad you didn't live here because I'd put you to work for sure.
All I can say is WOW!! You are my hero!!!!!!!
Defne, I can't wait for the pictures of what you come up with.
Deb, that sounds like so much fun! Maybe we'll have to plan a trip up there one of these Halloweens (except both Kenzi and Joey have birthdays in October and it's always a crazy month).
Thanks, Renee. I'm no hero, just a spastic crafter willing to try ridiculous things.
That is so cool. At first glance I thought your house was made out of fabric or felt. The fact that it is an actual cookie is totally cool!
Awesome! I love that you use Halloween as your testing ground for new techniques. So smart! Also, I love the roof trick. Brilliant!
You are so clever!!! Now I'm going to (try to) make one of these for Christmas!
I just wanted to mention to anyone that does give the stained glass candy windows thing a shot... I've recently created a Stained Glass Cookie pool over at Flickr for you to show off at. I can't wait to see what everyone comes up with.
whoa.. that's a seriously fantastic halloween house. i'm crazy impressed!
so cool!
I love this idea for a Halloween cookie shack!! Wow what a great craft!! Truly beautiful and unique.. I'm writing from www.bulbinblue.com, a non-profit website for creative ideas and crafts. We'd love to feature your tutorial in our upcoming Halloween section. If you are interested, please e-mail us at blueteam@bulbinblue.com
Sincerely,
The Blue Team
Post a Comment