Tuesday, October 30, 2007
What I Should Be Doing
But instead I'm working to finish a Queen Amidala costume for tomorrow. The headpiece took so long that I didn't even start the dress until yesterday. I'll post pictures of it, but probably not until after Halloween.
And I don't even remember the last time I meditated.
Not good.
Labels:
Crafts and Art,
Deeper Stuff
Monday, October 29, 2007
Monkey Party
Ever since we received the Martha Stewart Kids magazine that showed the monkey birthday party, Joey has wanted one. But, for one reason or another, each year she ends up choosing a different theme.
Finally, this year, it happened. And it was great.
This is a picture of Joey reenacting the blowing out of the candle (Jenny's camera was a bit slow and missed the original action). Such an actress.
The monkey cake is described in detail on Martha's site (with video) and was a collaborative effort of mine and Jenny's. I made the head (in a metal bowl) and ears (large cupcake tins). I also did the first layer of frosting with the homemade chocolate butter cream recipe in Baking Illustrated, the baking bible at our house. Jenny did the final smoothing, which worked beautifully with that awesome frosting. She also did all the decorating with the piping bag. Yay for buttercream! Oh yah, and yay for Jenny!
Off Topic (kind-of)- Cook's Illustrated is the best thing ever. Really. They have monthly magazines and a bunch of awesome hardbound cookbooks. Also, they have a recipe website that has a yearly fee to access, but is so worth it. I cannot say enough good things about Cook's Illustrated. They are very precise in their directions, and just about everything we've ever made from any of their recipes has been fantastic. And they aren't paying me to say this (although they should).
Resume post- I also made Banana Coconut Cream Tinies
These are adapted from Cook's Illustrated's recipe for a Banana-Caramel Coconut Cream Pie with Dark Rum. (Sorry, the link won't work unless you want to sign up for their free 14 day trial, which you really should do) And yes, that pie is as incredible as it sounds. My version, above, does not have the caramel or the whipped cream topping (or the rum since it was for kids) and I made them in mini cupcake pans, which was just a perfect little amount. (Click here and scroll back to see my making-of pictures)
Here are the decorations (thank you Tommy!)
And some shots of the various activities.
I gave them brown pipe cleaners and brought up this on the computer screen to let them try their hand at making monkeys.
I also gave them markers, glue, google eyes, felt and scissors and let them decorate little wooden monkeys. (Can you tell how much I love arts and crafts?)
But the best activity was actually Barrel of Monkeys. I bought a couple of them at the grocery store and we timed the kids to see who could pick up the most in one minute. Joey's little 5-year-old cousin kicked everybody's butt the first round. It was great. The kids were so quiet. That is, when they weren't giving helpful advice. When the time was up, or when monkeys fell, everyone groaned. One little girl kept whispering, "Oh dear, oh dear, oh dear," when it looked like one of the monkeys would fall. So cute!
We also played a game called Monkey See, Monkey Do. One kid leaves the room. Then you choose one of the remaining kids to be the leader. Once the first kid (the guesser) enters the room, all the kids need to follow the leader and do whatever he/she does. The guesser then needs to figure out which of the kids is the leader. If the leader goes slow enough and the followers keep from making too much eye contact, it's fairly difficult to guess. This is a pretty fun one too.
I'll end (finally) with a picture of the goody bags that Joey and I made. We adapted these from Martha's version that used cups instead of bags. We couldn't find brown cups, but I had a drawer full of these, so there you go.
For any public pictures of the party that I haven't already put into this post, go here.
Added Note- I forgot to mention that we decided it would be best to attach the monkey ears on the cake using wooden skewers instead of the toothpicks that Martha recommends. Jenny used two halves of a skewer on each side. Worked like a charm.
Labels:
How To,
Parties and Presents
Friday, October 26, 2007
Video Killed the Radio Star
For some reason, this makes me incredibly happy. I'm proud of these kids and I've never even met them.
I'm such a mom.
Added Note- I completely forgot to add that their band name is The Wrong Trousers, which I love as well, because it's the name of a Wallace and Gromit short.
I'm such a mom.
Added Note- I completely forgot to add that their band name is The Wrong Trousers, which I love as well, because it's the name of a Wallace and Gromit short.
Labels:
Random
Tuesday, October 23, 2007
Halloween Karma
Karma has come and bit me in the ass. I used to love to scare people (OK, mostly Jenny) when we were younger. In fact, it's surprising that she still speaks to me. But, as is necessary for all good relationships, we've worked it out. And I'm much nicer to her now. Though, why she's nice to me, I have no idea.
Growing up, our bedrooms were on the opposite side of the house from our family room. When it was time to go to bed, we'd have to walk down the stairs and neither of us liked to do it alone. One night, Jenny refused to walk with me, so I decided to scare her instead. I hid in the shadows and waited for about 10 minutes or so. (Remember the reason that I wanted her to walk with me was because I was afraid to walk on my own. Now I'm hiding in the darkness, alone. Revenge is powerful.)
When she finally came down the stairs, I waited until she was past where I was standing (so she wouldn't run back up to mom) and put my arms up in the air and yelled. She immediately started screaming and running. In my mind's eye, I see her feet looking like those big wheels in Scooby Doo. The hall had a 90 degree bend in it and Jenny didn't even slow down to take the turn. What I heard was, Waaaaahhhhhhhh… thunk… waaaaaaahhhhhhhhh. At least that's what I could hear over my laughter.
I'm such a bitch. I'm laughing right now.
I'm so sorry, Jen.
After hearing some of the stuff I did, Joey told me, "It would have sucked having you as a big sister. Sorry, I'm just saying." And I'm sure all of my siblings would agree. But, like I said, I'm nicer now.
Karma soon tried to pay me back by sending a neighbor in a monster mask to my window one evening in October. But after I stopped screaming, I started laughing. I like haunted houses and being scared in that quick, startling way.
So, since I've repented my ways and no longer intentionally scare anyone (Jeff is really jumpy and unless I announce myself upon entering a room, he behaves as if I've snuck up on him.) I think Karma gave me a temporary break.
Until I got the email.
I opened it and read the following… "This is a car advertisement from Great Britain. When theyfinished filming the ad, the film editor noticed something moving along the side of the car, like a ghostly white mist. They later found out that aperson had been killed a year earlier in that exact same spot. The ad was never put on TV because of the unexplained ghostlyphenomenon. Watch the front end of the car as it clears thetrees in the middle of the screen and you'll see the white mist crossing in front of the car then following it along the road....Spooky! Is it a ghost, or is it simply mist? You decide. If you listen to the ad, you'll even hear the cameraman whispering inthe background about it near the end of the commercial. A little creepy but pretty cool!"
So, on this advice I watched the attached video. Before I give you the YouTube link, I'd like to give the following warnings… This is very scary. Do not let your kids watch this with you. And do not watch unless you enjoy being frightened.
After you've watched it (if you want to) scroll down and read the rest of the post.
Random picture to take up space:
So, I screamed. And then Joey and Randa (who were the only ones in the room, although not watching the video) screamed. And Jeff came running into the room because he thought that somehow the computer was electrocuting me. That's the kind of scream that I made. A long, choked, gurgling thing.
By the time he got in here, I was laughing hysterically. I couldn't even speak to tell anyone what had happened. I just kept laughing and literally couldn't stop. Oh my Hell, I'm laughing now and this happened on Saturday.
That part wasn't the payback, though. Wait for it…
So, I let Joey watch the video. I figured she already had seen me screaming and it would be worse in her imagination than it really was. She screamed for a good 30 seconds. After that she would not go anywhere alone, not to the bathroom, not to her room, nowhere. This was full-on anxiety attack sort of thing. We let her sleep on our bedroom floor the first night, but she was even afraid there.
As I lay on on her cold bedroom floor while she slept in her bed (the best arrangement for her) I realized that I had finally been paid back. Being frightened wasn't the payback. Having to comfort the frightened was.
Labels:
Random
Wednesday, October 17, 2007
Hand Cut Noodles
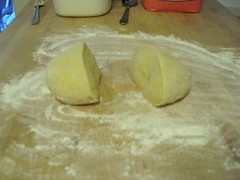
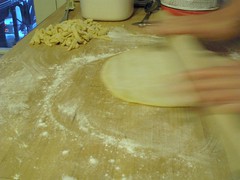
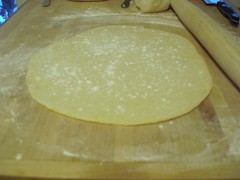
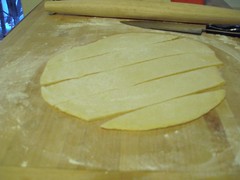
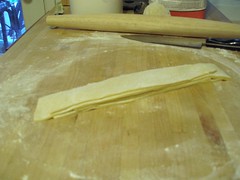
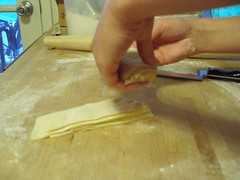
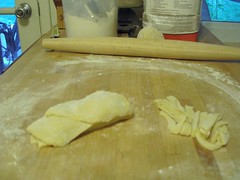
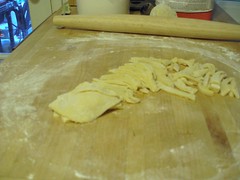
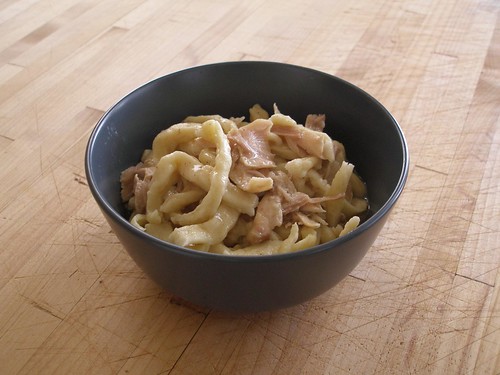
So, here's the pictorial instructions on how to roll out and hand cut noodles to go with my chicken and noodles recipe.
Pretty self explanatory, I think.
Labels:
How To,
Recipes and Other Cooking Stuff
Tuesday, October 16, 2007
Homemade Chicken and Noodles Recipe
The night before we did the Walk/Run, I made up a batch of my Grandma's chicken and noodles. We were carbo-loading and, believe me, these do the trick.
The traditional way (in our family) to serve these is spooned over a big bowl of mashed potatoes and topped with cooked corn. Now, that's a plateful of carbs. A bit unnecessary, though, considering that we only walked the 5K.
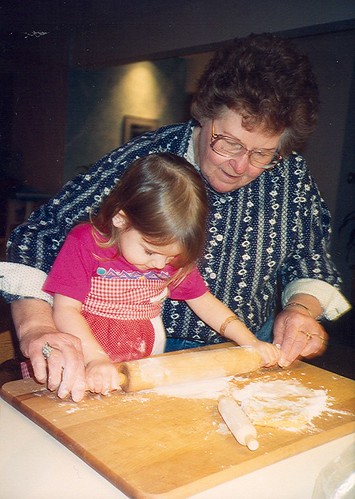
I learned this recipe from my Grandma Gay; she began teaching us granddaughters how to roll out the noodles (with dowels) when we were 5 or so. I think that she made this (or our other favorite- homemade mac and cheese) literally every time we visited for dinner. Until I was 10, I thought that's all that Grandma and Grandpa ever ate. I wished I lived there.
That's me in the blue shirt. Jenny's the towhead second from the left.
And this is our Grandma, several years later, helping one of our younger cousins roll some noodles.
This is the ratio of ingredients for the noodles. It's so easy that after you make it once or twice, I'm sure you'll have it memorized.
Ingredients for a batch to feed about 8 people
2 cups flour
1 largish pinch of salt
4 eggs
chicken broth (4 to 6 cups depending on whether you want actual soup or just a pile of noodles)
chicken (either precooked rotisserie, chicken breasts or whole chicken-> from easiest to most difficult)
Instructions
1- Bring broth to a boil. Add the raw chicken (if using).
2- Mix salt in with flour in mediumish/largish bowl.
3- Make well in the center of flour (like you do in mashed potatoes to hold the gravy) and crack eggs into it.
4- With your fingers, break up the yolks and mix the eggs.
5- Begin incorporating the flour into the eggs as you swirl your fingers in a circle.
6- Mix, squish and knead with fingers only until all the flour is completely mixed in and holds together (don't overmix or it gets really hard to roll out).
(video for mixing dough- and that phone ringing is on the video, not at your house)
7- Cut dough in half.
8- Roll out to about 1/8th inch thick (they get thicker as they cook) on a floured surface.
9- Cut noodles as shown below or follow noodle cutting instructions here and set out to dry.
(video for cutting noodles)
10- When chicken is completely cooked, pull it out (that is if you added it raw earlier... skip this if you're using rotisserie), let cool and then shred it into bite sized pieces while noodles are cooking.
11- Bring broth back to a boil, add noodles and cook until tender (about 15 to 20 minutes at High Altitude).
12- Add shredded chicken to pot. Season with salt as necessary.
13- Spoon over a plate of as much starch as you can find (mashed potatoes) and then top with more starch (corn).
14- Run marathon within 24 hours.
Yumm!
--------------------------------
Related Posts-
Hand Cut Noodles
Monday, October 15, 2007
A Little More
So apparently when I try to type up a quick little post, I forget many crucial elements.
Like mentioning the fact that Joey's costume was of a chicken. I'm sure most of you could figure it out, but duh!
Or that it was fairly simple to assemble...
-white tights dyed yellow
-white leotard
-2 white feather boas
-1 pair of yellow rubber gloves
-stuffing
-aviator's hat
-felt sewn (or hot glued) into the shape of a comb, stuffed and sewn (or glued) to top of hat
You basically sew the boas all over the leotard, stuff the gloves and assemble the hat. It only took me a couple of days. I think it was the most satisfying costume I've ever made. And everyone loved it.
Labels:
Crafts and Art
Bock, Bock, Bock
So, I just read about the fact that today is Blog Action Day, but the post that I'd like to do for it is based on a project that isn't quite done yet (and has been sitting in project semi-limbo for a good two months). So, tune in in a day or two for that.
Instead, I'm thinkin Halloween costumes. We just started Joey's costume this past weekend and since I don't have any good pictures yet, I thought I'd include some past ones.
However, most of the really good costumes were taken before we had a digital camera, which made it extra hard to post about. Computers have made me extremely lazy. I've never been nearly as good at organizing actual photographs as I am with digital ones. So, to use the pictures of my favorite of Joey's costumes, I had to scan a couple pages from her scrapbook.
I found the idea, once again, in the Martha Stewart Kids magazine (or maybe it was Baby). She was about 4 years old and it was so fun and relatively easy.
These last two pictures are my favorites. They occurred at that point in the night when she no longer wanted to be wearing a costume and was seriously fed up with the whole thing. Such a sad little chicken... bock, bock, bock.
Labels:
Crafts and Art
Friday, October 12, 2007
Oh, Waiting's So Hard To Do
I've never quilted before. It's not that I don't like them or anything, I just don't really sew all that straight, so I figured it would be an exercise in futility.
However, I recently decided to give it a shot. Mainly because I had a super cool idea for Kenzie's birthday present. (When a mom says she has a super cool idea for a birthday present for a teenager, watch out- it probably isn't. And knowing how my last super cool birthday idea turned out, I should have been more anxious. Oh well, I'm nothing if not optimistic.)
When we first moved into this house, Kenzie wanted a Spongebob room. (more Flickr pictures of her room here.) But, for the last year or so, she's been slowly covering up every inch of wall space with various posters. Goodbye SpongeBob, hello Rock 'n Roll (and Johnny Depp*).
As you can see, lots of music posters (the Janis poster used to be mine, and I was thrilled that someone wanted to use it). Kenzie plays guitar and every now and then there's talk of forming a band, but we haven't been invited to any gigs yet, so I think they're still practicing.
Anyway, I decided to take a bunch of black, band t-shirts and use them to make a duvet cover like this one (so I wouldn't need to actually have it quilted). I looked all over the internet for ideas and was given the helpful suggestion to iron interfacing onto the shirts before cutting to size, so that they wouldn't stretch out or curl up (when cutting or sewing). So, after three trips to the fabric store and the purchase of 2 different kinds of what is basically iron-on glue (Wonder Under and Heat n Bond- not what I should have gotten) I finally decided to actually look for the words 'Fusible Interfacing'. Duh. I'm OK with having bought the other stuff, though, because you just never know when you're going to need to iron two pieces of fabric together.
I was going to do a brief overview of the process, but it's fairly simple and is covered well here and here.
Basically, the main difference between this and a regular quilt is the use of fusible interfacing to stabilize the t-shirts. It's also easier because… 1) big blocks require less cutting and sewing and 2) it's a comforter cover, so there's no need to actually quilt.
What surprised me most about this project, is the fact that it actually turned out pretty great.
Oh, I also made a pillow out of one of the t-shirts that was smaller than I could use.
*Am I the only one that finds it extremely weird that my daughter's crushing on the same guy that I did when I was her age?
Wednesday, October 10, 2007
Scentual Jewelry Winner!
You guys gave me so many great suggestions for my Ruby Red aromatherapy necklaces! It really was hard to choose. In the end, I simply picked my 10 favorites and let the graphic artist decide. I think he chose well. For him, it had as much to do with the length of the word as the meaning.
So, here's one page of the wonderful pamphlet he's be slaving over (thank you so much, Doug!). He showed me the test copy this past weekend and I'm just dumbfounded. I'm not surprised that he did a professional job (because he is nothing if not professional); I'm surprised that he was able to make my business look so professional (because I am many things besides professional).
So, for those of you checking for your name, I'll save you the suspense and just say that Madmommy is the winner! Please let me know what color you would like as well as what length you prefer (the usual length is 18", but for some women that is too long). And I'll get it in the mail soon. Oh yah, I guess you should probably email me with your address. (What? The post office can't deliver based on email yet? Slackers.)
Thank you all so very much for your suggestions! I appreciate your help so much. The next time I'm stuck, I'll save myself weeks of pondering and just ask. Also, maybe I'll have to come up with some more giveaway ideas one of these days. But until then, if any of you just must own one of my necklaces, feel free to head over to my etsy shop.
Labels:
Aromatherapy,
WOM
Tuesday, October 9, 2007
Something a Little Simpler
So, if my last pumpkin carving project seemed a bit complicated to you... you might like this one instead.
Go to Zombie Pumpkins, sign up (memberships start at $5.00) and download as many patterns as you need.
These are some seriously cool patterns! Way better than anything you'll find in that crappy pumpkin carving kit. Ryan has lots of different categories including...
Rock Gods-
Television Terrors-
Movie Monsters-
Kreatures for Kids-
And they are so easy to do. Well, some are a bit more complicated than others, but the great thing is you can pick and choose. You use them just like the patterns in the pumpkin carving kits you see everywhere at this time of year. But these are way more interesting.
My favorite thing about these is that you can download them, print them and start carving immediately. There is a huge selection and the designs are so much better than anything I've seen.
They've also got a gallery that includes pictures of pumpkins that people have carved using patterns from the site. If you like carving pumpkins, this will really get you in the mood!
Labels:
Crafts and Art
Thursday, October 4, 2007
Kam-tastic
I don't know if any of you got the hint from my last post, but I decided to brush up on my pumpkin carving skills today. Some people train for marathons by running before the event; I train for Halloween by carving watermelons.
OK, so honestly, there's nothing special about watermelons and I don't actually do this every year.
I just happened to have an uneaten watermelon lying around. And since Kam's birthday's coming up, I decided to do one of him. I asked Jenny to send me some pictures of this snarky face that he does. We decided that one of them would be perfect if we just added some horns...
Jenny's the one that actually drew on the horns. I think they're perfect, as is that sweet face and the arched eyebrows. Isn't he just the cutest thing ever?
Oh, and I made the executive decision that for this portrait, Kam would be bald. I just couldn't face all that thin hair. Not until I figure out a better way to do it, anyway.
One of these days, if I have an entire weekend to do nothing but carve pumpkins, take pictures and write instructions (because there are a lot of instructions), I'll post exactly how I do this. Until then, please check out this fantastic tutorial by Nitrozac. It's where I got the idea for this. For the most part, I follow the steps he describes.
Here is my abbreviated version...
-Find (or make) high contrast black & white picture.
-Draw lines around white areas, gray areas and black areas.
-Tape to watermelon/pumpkin with clear packing tape.
-Use pushpin to mark dots along lines.
-Drill white dot in middle of iris.
-Completely carve out the white areas, remove skin on gray areas and leave black areas alone.
-Look at it lit up, in the dark and refine.
So, I didn't actually get any pictures of the in between part. Mainly because I was, you know, carving. I did stop to eat some pizza and watch 30 Rock, but other than that, I kept at it. And it really wasn't that difficult. It took me about 2 hours or so. Doing his gigantic noggin was the most tedious part. Very hard to get smooth. I need to get a better scraper. And I definitely like the eye on the right (when looking at the picture) better than the one on the left. And the ear was a bitch. I just couldn't figure it out. But I think for the most part, it turned out pretty cool. I think I'm getting better.
You also may have noticed the flashlight shining in on it from the left there. This is because after I cut off the top (and Jenny and Kam helped scrape out all the pink stuff) I realized that Kam's head would fit much better if it were sitting sideways. So, there's tip number one... match your picture to your watermelon/pumpkin before you cut into it. Although, it did work out fine, because it was easy to refine with the flashlight just lying next to it to light it up.
And here's a picture showing it with the lights on. The Kam-mask with the glowing green eyes lying next to the watermelon is what I pulled off after poking it all over with a pushpin.
The cool thing is that the eyes actually turned green after I drilled into the middle of them. I guess if you did this on a pumpkin, they might turn orange.
So, I guess that's it.
Happy Birthday, Kam! If this doesn't show you how strange your Auntie Dee Dee is, you're just not paying attention.
Labels:
Crafts and Art,
Friends and Family,
How To
Wednesday, October 3, 2007
My Little Sister
Exactly one year ago today, my wonderful (and very pregnant) sister was bending, crouching, squatting and generally splaying herself across my back lawn in order to take these pictures for me and my new business…
I didn't get a picture of her then, but I bet she looked something like this, only more pregnant…
(Jenny helping trace characters on Joey's walls a couple of months earlier. Please ignore the messy closet.)
Less than 24 hours after the backyard photoshoot, she went into labor. A very hard and very long labor. The birth of my daughter was relatively easy, as was the three other deliveries that I had been lucky enough to attend.
When Jenny was in labor with Kam, though, it was different. That boy did not want out. I know that every woman in labor works hard, but I'm still amazed at Jenny's strength. At one point, the midwife was very worried and basically gave her one or two pushes to get him out. As soon as Jenny understood that her baby was in trouble, you could see the look on her face change from that far away, zoned-out labor thing, to complete and utter determination. And then she did it. And Kam was born. And we all cried.
In the past year I've seen that same determination in how lovingly and consistently she parents. Kam is one lucky little man to have such an amazing mother. Oh yah, and Brad's cool too.
I think one of the reasons for the difficult labor is the fact that my sister is a very skinny person; she's just naturally thin. And let me just say this about her old man... Brad has a huge head. Huge. And, despite the many promises from Jenny's mother-in-law that Brad was not that way at birth, their son (as it turns out) also has an enormous head.
Hmmm, actually it's the perfect shape to design my next watermelon/pumpkin carving project...
Labels:
Deeper Stuff,
Friends and Family
Subscribe to:
Posts (Atom)