


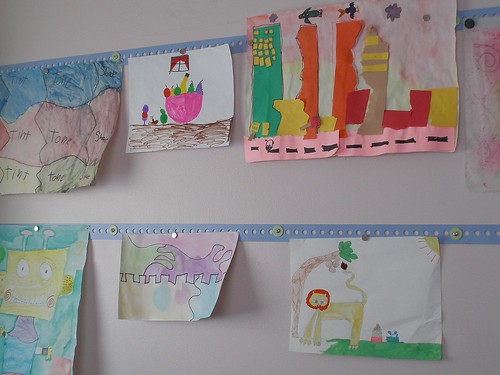
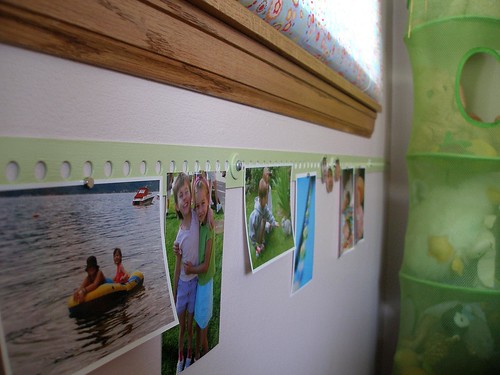
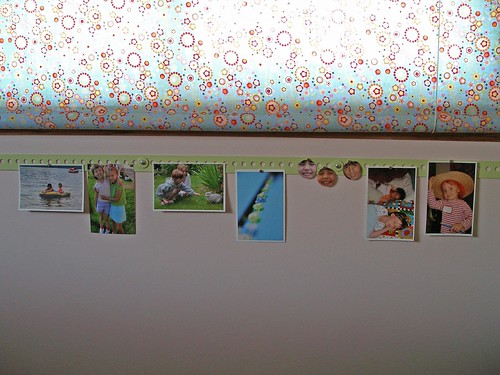
This weekend, I did up a new one for her favorite photos and thought I'd give a quick tutorial.
Supplies
-1 strip of flat metal with holes in it (make sure you test it with a magnet before you bring it home. And, yes, to find this, I basically walked around the home improvement store sticking a magnet to pieces of interesting looking metal) If you can't find one with at least a couple of holes in it for attaching to the wall, you'll have to drill your own and most likely have to buy a special drill bit for metal.
-First coat of paint- Metal Primer (The important thing to look for on the back of the label is a section called Priming that recommends it for use on bare metal.) If you can find a color you like in this, go ahead and use it as both primer and final color.
-Second coat of paint- Final Color (whatever kind you have or can find- I used left-over semi-gloss)
-Last coat of paint- Clear, Protective Enamel (this isn't completely necessary, but does cut down on the tiny bit of flaking paint that I experienced the first time I tried it.)
-Screws
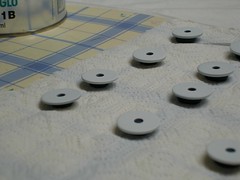
-Washers (I needed these because the size of the holes were bigger than the heads on the screws)
-Magnets
How To
-Basically, I washed everything but the screws with soapy water and a piece of steel wool, rinsed well and let it air dry.
-Then I coated the metal strip and washers with the paints in the order listed in the supplies, letting everything dry thoroughly between coats. (The vast majority of time for this project is really just waiting for the previous coat of paint to dry; it's really only about half an hour of actual work.)
-Then I hung it up (marked the studs, used a level to mark the hole placement, drilled pilot holes and attached to the wall with screws).
Tips
-Originally, I had bought some of that magnetic paint and covered a piece of molding with it. I did several coats and the magnets just didn't stick all that well. Paper tended to go flying if we had the ceiling fan on or windows open. Trust me, the metal works much better.
-You may need to do more than one coat of any one of the paints.
-Read the paint labels for the wait times between coats.
-I suggest using a sponge brush, because it tends to leave fewer marks than the regular bristle brushes.
-I put the metal strip up on saw horses for painting.
-I used small pieces of polymer clay to hold the washers up off the paper towel when painting.
If you want to skip the painting part, it'll just have a more industrial look. The project will also be much more environmentally friendly and a lot easier.

17 comments:
what a neat and pretty easy idea, you're very talented.
Gill
What a wonderful idea, and a great alternative to all of the pictures my daughter tapes all over her room. So smart!
Um, yes. I love this a lot. So much so that I submitted it to CRAFT: and I also plan to make it.
Sometime soon. Perhaps as a way to hang my recipes where I can see them in the kitchen because the fridge is not ideal.
This is an awesome idea. I was thinking about using the magnetic paint but now I am going to go this route.
I love this idea. We will be redoing my daughters room soon and she has so many tidbits that she likes to hang on to...and she is only three - this may help to keep everything all in order. Thanks again for sharing your skills :)
cute, cute, cute idea! Just ran across your blog on parent hacks (also new to that site). Going to try this in my son's room. And just leaving it metal may look cool in there, since his border has the industrial/old cars metal look and he has a metal-looking bed. Thanks for sharing!
Been a while since I've been here...great to see you are still up to creative stuff! This is a fab idea. I like Finny's idea about instead of fridge...cause ours doesn't stick and that sucks.
and, so why does it have to have holes?
Finny, thanks so much for submitting this to CRAFT! I always appreciate that. It's always so fantastic when they feature one of my projects.
Dig this Chick, thanks for the question. It doesn't need as many holes as this one has (I just liked the design), but it does need at least a couple for attaching it to the wall, unless you want to figure out another way to do it (some kind of metal tie down strap perhaps). I'll fix the post to clarify.
I came here via CRAFT: to see your simple yet effective method of displaying artwork. Great idea! I've been thinking of wire and pegs or clips, but this seems a lot sturdier.
Smart and cool looking! I love this idea. I have some of the expensive, fancy magnet boards, but I love the idea of painting my own. Yay for genius!
Awesome! Getting ready to do this this weekend! How long are the pieces? How do the ends look joined together? Is it on one wall or all the way around the room?
I'm excited that so many of you are trying this! I'd love to see pics.
Angie, they are 6 feet in length and I did not put them in one line around the room, though I did consider it. You'd most likely need to cut them to length to do it. Personally, if I wanted them all around a room, I'd center one on each wall. As far as how they join together, if you found some exactly like mine, the ends are each finished with a half circle, so there's a good chance they'd go together cleanly, especially if you put the screws and washers there at the joint.
This is awesome! I'm in school to be an art teacher and when I [finally] graduate I plan on using this for my classroom. Thanks for sharing
I know I'm late to the game, but I just wanted to thank you for such an awesome idea. We put it up in my son's room and I totally love it. Left the metal unpainted and I think including going to the store and back, the whole thing took an hour. THANK YOU!!
Oh, I love this! We have two wall-length wine cork art display holders (hmmm, does that send the right message to our children? Do we really drink that much wine??) but I've been looking for an idea of similar width to put in between those-- and I think I've found it!
Hey! thus one is so cute! Great idea!
Post a Comment