


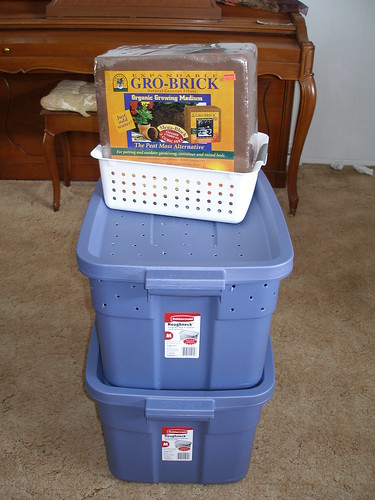
First, here is the kit that most of this information references.
I donated this to a silent auction and wrote the following to go with it.
What This Worm Composting Kit Contains
- One block of coconut fiber to function as bedding (from a local garden supply stores, hydroponics stores or online ordering)
- Two large plastic bins (I got mine at Target)
- One is without holes- this is for hydrating and storing coconut fiber
- One has many holes drilled in the lid and on the top 4 inches of the sides- this is the bin for the worms
- One small, white, plastic container to use for transferring worms when bedding has been turned completely to castings. (I got mine at Target)
- Redworms- aka Eisenia fetida (from Flowerfield Enterprises or from a friend with a worm bin)
- Wet the bedding.
- Sprinkle on dirt.
- Bury the food scraps.
- Add the worms.
- Add food wastes as you collect it.
THAT’S IT!
Very (Some Might Say Overly) Detailed Instructions- Unwrap and place the coconut fiber into the blue tub that doesn’t have the holes.
- Pour several gallons of water onto it. You can use cold water, but hot water soaks in more quickly. Let the coconut fiber sit for awhile (10 to 30 minutes). When it has absorbed most of the water, add more. Keep pouring water, letting it sit and so on until you are able to scoop out handfuls of fluffy coconut fiber. Only add enough water to loosen enough coconut fiber to fill the worm bin. You should still have extra still-compressed coconut fiber left in the original bin.
- Transfer enough of the fluffy coconut fiber to the worm bin (the one with the holes) to fill it within 5 or 6 inches from the top.
- Now, to the coconut fiber in the worm bin, add enough water until it has the consistency of a damp, mostly wrung out sponge. Stir it well as you add the water, so that it is the same dampness throughout. Right here is the hardest part about vermicomposting. If the bedding is too dry, the worms will die (or at the very least, not flourish), if it is too wet, it can get to smelling bad. Basically, if you pick up a handful it should be pretty damp, but not quite to the point where you can wring much water from it, only a drop or two.
- Next is the step that enables the worms to break down the food. They have gizzards (like chickens) and so need some grit in order to eat. Grab a handful or two of dirt from your yard and sprinkle it over the bedding.
- Now your worm bin is ready for the food.
- Worm bins can take all kinds of kitchen scraps… fruit, egg shells, pasta, vegetables, coffee grounds as well as coffee filters, teabags, etc. Basically, you can add everything except meat, dairy or anything too oily or salty. Also, you should not add pet wastes of any kind. The bin functions best if you cut up all your scraps into small pieces. I let eggshells dry for a day or two and then crush them with a rolling pin or mallet before I add them to the bin. (Note- Adding lots of eggshells to your compost also helps to prevent blossom end rot when you apply the compost to your tomatoes.)
- I save all kitchen scraps in a specially marked Tupperware in our fridge and then add them to the bin every 3 or 4 days. If you have any fruit that has attracted fruit flies, I suggest microwaving it till it’s hot (and letting it cool) before adding it to the worm bin. Once fruit flies get too entrenched in a bin, it’s usually better to just start over from scratch (I’ll give you more worms if that happens- but it’s unlikely to happen if you keep an eye out for them.).
- Now comes the only other difficult part of worm composting, figuring out how much to feed them. When you first start out, it’s better to go with less food rather than more. As your worm population grows, they will be able to eat more and more of your scraps. One pound of worms can eat about half a pound of scraps a day. Trust me, your population will grow if given time.
- Each time we add food to the bin, we bury it in a different spot. If you’re organized, this shouldn’t be too hard, just move in a grid-like pattern. You can work your way back and forth, from front to back. By the time you get back to the first place where you originally buried scraps (a week or two later), the scraps should be mostly gone. If you do happen to dig somewhere that still has lots of food, cover it back up with coconut fiber quickly. This is one of the only times you will smell something unpleasant. If you see lots of stinky food scraps, you’ve either dug in the wrong spot or you need to let your worm population grow a bit more before adding more scraps. Or it’s possible that you haven’t cut the scraps into small enough pieces. Myself, I sometimes put the food into the food processor with a little bit of water and pour that into a hole in the bedding. The worms will eat this slurry a lot quicker than if the food were in chunks. Just make sure not to add too much water, because your bin can get too soggy.
- I’m not organized, so I find myself digging into areas that still have food scraps, so I just keep reburying them and looking elsewhere. If you’ve got more than one person adding scraps to the bin, I suggest you make a diagram and keep a log.
- There are only two rules about burying food…
- Make sure that the food scraps are completely covered with the bedding, at least an inch of bedding.
- Don't add too much food at once. It is better to add too little than too much.
- So now, the bedding is not too soggy and not too dry and you’ve got food buried in one or two places in it. It is time to add your worms. Spread them over the top of the bedding. They will all move down into the bedding, especially if you leave the light on.
- That’s it. Put on the lid and let them go. Make sure to only use a lid if it has plenty of air holes. If not, you can just cover the whole thing with black plastic. This is necessary to keep out light and also to keep it moist.
--------------------
Related Posts-
Worm Composting (2)- Some Other Thoughts
Worm Composting (3)- Harvesting The Castings
Worm Composting (4)- Troubleshooting
Using Eggshells
Why You Need Worm Poo

5 comments:
Are holes needed at the bottom of the bin or will it be ok as long as too much moisture is not added?
I've used this set up with no holes at the bottom for quite some time. It does tend to be more wet than the wooden bin, but just make sure to add some dry coconut fiber or shredded paper down in there if it gets funky. Too much moisture equals stinky bin, while too dry equals unhappy worms. I doubt you'd need to worry about it being too dry in this type of bin, though.
You do want to make sure that if you're going to put a lid on it, that there are plenty of air holes at the top, though.
ok. I love your "style" of worm raising far more than other ways I found on the net.
I have a new worm project and there's been quite a bit of troubleshooting. I haven't killed any yet but it just finally feels like I'm doing it right. In other words they're no longer trying to escape.
All of the instructions I came across said "add newspaper (wet) sprinkle a bit of dirt in there and top with veg/fruit scraps." perfectly vague.
I'm about to set up a 2nd bin and will check out this coconut shred.
Thank you for all of your time on the matter.
katie
I live in Japan and we are headed back to Texas in about 7 months is it pointless to start composting now? The winters are horrible here!! What would I do with the compost since we are leaving?
Have you tried a container with holes at the bottom? I've seen the Can'o'worms contraption and the tray is full of holes at the bottom. I just wonder if the worms try to escape the bin if they're happy enough. Any ideas? I'm going to try it out in a couple of days.
Post a Comment