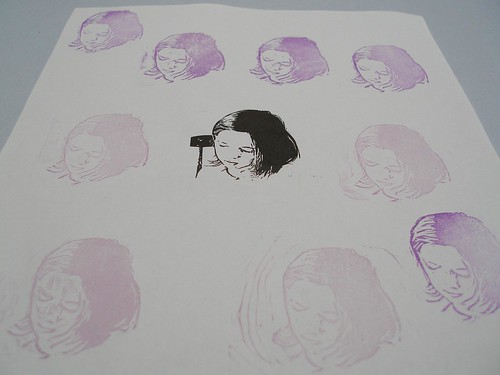
I've graduated from bookplates and little produce stamps to an actual portrait.

What on earth made me think that I could pull this off? I honestly have no idea.
But as it turns out, it wasn't actually that difficult (maybe because of all the practice I've had making bookplates for presents). It did take a few hours to complete, but I managed to get it right on the first try, which doesn't always happen around here.
I think it was helpful that I used a Mastercarve block this time, which was much less crumbly than the Speedy Cut brand.
There are 3 main steps...
-Change the original photo to look like a stamp using photo editing software.

- A high resolution picture with a white background works best. I used this one that Jenny took, but I could have removed that chair in the background and made it a bit easier on myself during the carving.
- Crop the picture to the area that you want to turn into a stamp, choosing dimensions that are the right size for the block of rubber you'll be carving.
- Apply the stamp effect. In my software, Photoshop Elements, it's under Filter -> Sketch -> Stamp.
- You'll want to mess with the Light/Dark Balance as well as the Smoothness in order to get something that looks reasonable to carve. Remember you'll be removing everything that is white, while leaving all the black areas.
- Now is a good time to create a horizontally flipped copy in addition to the original. This second, flipped image will be much easier to use as a reference when carving and you can print them both at the same time. (Image -> Rotate -> Flip Horizontal)
-Transfer original image to block using the same directions as in the bookplate stamp tutorial or if you have access to a laser printer or Xerox machine you can try using acetone (nail polish remover) which gives a much clearer transfer, though it does leave the black image permanently on the stamp.

- Print the image on a laser printer and let dry. Cut around design, leaving a half inch border.
- Wet a cotton ball with nail polish remover, squeeze to remove all excess liquid.
- Place the paper ink side down on rubber and tape in place.
- Quickly, with light to medium pressure run the cotton ball over the image. Do not go over any area more than once.
- Remove paper immediately.
- If it is smeared, you can remove the ink from the rubber by rubbing with the cotton ball. Let dry before trying again.

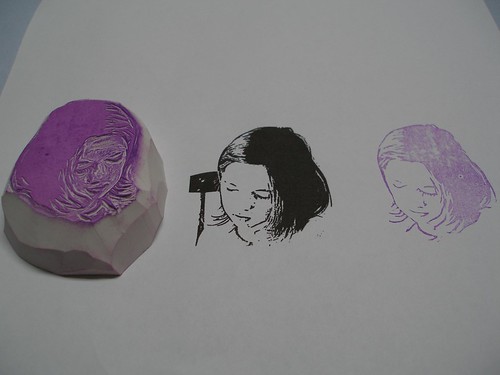
(In this picture the one on the right is the original image, which shows up reversed on the block. The one on the left is what I used as a guide while carving.)
-Carve away all the white.
- This video is an excellent resource (and also happens to be what inspired me to try stamp carving in the first place).
- Start with an easier area like the outline of her hair and move to more difficult areas like the thin black lines of her jawline and eyelids.
- When you think you've got all of the white areas removed, test your stamp. It'll be pretty obvious where you've missed.
- Continue carving and stamping until you're happy with the look. If you start to get tired or frustrated, you should stop immediately and come back to it later. It doesn't take much to really mess one of these up.

And I guess that's about it.
Now to figure out what I'm actually going to do with this.
Any ideas?
--------------------------------
Enjoy this tutorial?
Get more like it by subscribing to my RSS feed
-------------------
Related Posts
Contest Winner's Personalized Stamp
Personalized Bookplate Stamps (has a list of supplies)
Cute Little Produce Stamps

Wendy, that is just awesome! I would never be able to follow all those directions, but I am in awe at you for being able to do so. And the result is a work of art. I'm not sure what you're referring to as to what to do with the stamp - I thought you'd give it to Joey to use in her books? Maybe you could make some generic ones and sell them on etsy? It's a shame we don't do regular mail anymore so it could be used for letters!
ReplyDeleteWendy,
ReplyDeleteThat is truly adorable. You know I linked to you and had all these grand ideas about giving your bookplates as gifts...nothing came out "gift-able". BUT, I had a great time making them. You inspired me to try again! I wish I had your talent.
Wow! That is fantastic! What an artist you are!
ReplyDeleteSo cool!
ReplyDeleteWow, that is fantastic!!! I've been wanting to try stamp carving for a while now. One day I'm going to give it a go.
ReplyDeletehttp://www.minivanlife.wordpress.com
That is beautiful.
ReplyDeleteHow about making a set of your family to use on greeting/holiday cards? Or as a signature?
What a good idea...and well executed. Not that I'm surprised. One question, how long did this take? As for ideas on what to do with it, why not bumper stickers, t-shirts, cards, banners, all stamped with the image of the star of weird-kid Wednesdays.!!
ReplyDeleteThanks for the ideas everyone. Cards and bumper stickers it is!
ReplyDeleteDefne, it took a few hours. I didn't time it, but I managed to get it all done one evening while Jeff made dinner.
brilliant! it came out so well! i actually made 'hanko' stamps with my japanese high school class today in this method using a character from the japanese alphabet and they came out adorable. we used straight razor blades because the school didn't have exactos- but a photo!!! i would've never dared! it really came out great.
ReplyDeletehave you ever tried the whole linoleum block printing thing? you're such an artist i figure you're the person to ask! i'm thinking of trying those with my class as well but have never ventured into that arena...
Gorgeous stamp. I'll have to try doing stamps of my kids sometime. They would love that!
ReplyDeleteyou should make her a little notepad with a thought bubble over her head to write notes in. They could say. "I am feeling_____" or "I think I will______" or "I wish I could______"
ReplyDeleteOH! I love all of your work. It's been a super exciting process. Hopefully I can get this thing made for real. :)
ReplyDelete